Teaching Geometry – Position, Direction and Coordinates KS2: A Guide For Primary School Teachers From Year 3 To Year 6
At Key Stage 2, pupils will experience many concepts which fall under the umbrella of geometry. A fundamental part of KS2 maths is coming into contact with coordinates grids and being able to both read and plot grid references. This blog sees Neil Almond give a thorough guide on how to cement this skill at each year level, and includes plenty of primary resources and printable worksheets at the end.
One of the most fascinating aspects of teaching KS2 maths is noting the difference in pupil’s understanding when it comes to shape vs number. Too often I have seen those that are perfectly fluent in number struggle to come to terms with aspects of shape.
On the other hand, those who may struggle to recall their times tables can master shape in no time at all. It can be a really humbling experience for all parties involved and with the right classroom culture, a real threshold moment.
However, it is also my experience that this is, and I include myself here, where the subject knowledge of the teacher is weakest. Dedicating time and effort to ensure that we do not add to pupils’ misconception is key – being dutifully aware that a square is a particular type of rectangle must be paramount.
Theory Behind Teaching Geometry KS2
There is no real ‘theory’ behind how best to teach coordinates, position and direction. But there are two things I wish to draw attention to.
Firstly, It should be noted that when considering progression within position and direction within primary school, all year groups bar Y3 have this stipulated in the national curriculum.
Therefore, while there is no new content to learn it would, in my view, be beneficial to recap over the requirements from Y2. These can be found below:
In the national curriculum for maths in England, for each area of maths outlined, there is both a statutory requirement and a non-statutory requirement. The statutory requirement is as follows:
- order and arrange combinations of mathematical objects in patterns and sequences
- use mathematical vocabulary to describe position, direction and movement, including movement in a straight line and distinguishing between rotation as a turn and in terms of right angles for quarter, half and three-quarter turns (clockwise and anti- clockwise).
Free Geometry Independent Recap Worksheets
Help your Year 4 (and older) students revise geometry with our free Independent Recap worksheets
Download Free Now!The non-statutory guide is as follows:
- Pupils should work with patterns of shapes, including those in different orientations.
- Pupils use the concept and language of angles to describe ‘turn’ by applying rotations, including in practical contexts (for example, pupils themselves moving in turns, giving instructions to other pupils to do so, and programming robots using instructions given in right angles).
The second, and perhaps the more controversial stance, is that we need to stop telling pupils to ‘go along the corridor and up the stairs’ when plotting coordinates.
I hope that these documents are read by all teachers so they can swiftly see what the progression of each area looks like.
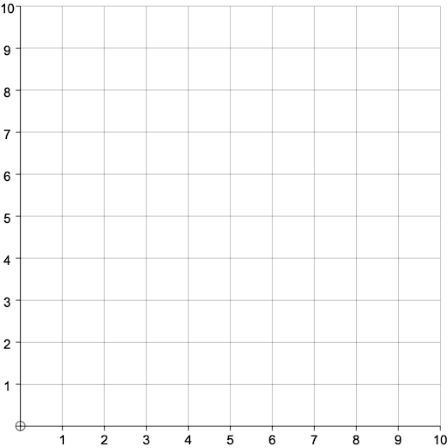
It stands to reason then that Year 4 teacher who teaches their pupils to ‘go along the corridor and up the stairs’ will see that this works when working in the 1st quadrant:
However, when they get to Year 6 and need to explore coordinates up to the 4th quadrant, we can see that going ‘along the corridor and up the stairs’ falls down very quickly as a useful tool to help pupils remember the order to look at the axis. As can be seen below, if I want to plot the coordinate (4,-5), I would now need to go along the corridor and then down the stairs.
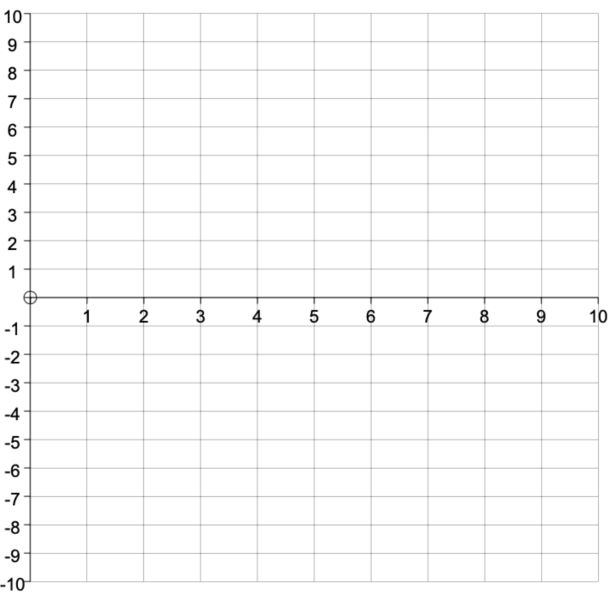
In short, it pays dividends, when considering the whole mathematical journey a pupil makes throughout their schooling, to put in that extra time embedding that the first coordinate relates to the X-axis and this is the horizontal axis. The second coordinate relates to the Y-axis and this is the vertical axis. Thus we use the X-axis to plot the first coordinate and the Y-axis to plot the second coordinate. The long-term goals of producing confident and capable mathematicians should trump short termism.
Unlimited primary maths tutoring with Skye, the voice-based AI maths tutor.
Built on the same principles, pedagogy and curriculum as our traditional tutoring but with more flexibility, reach and lower cost.
Join the schools already helping hundreds of primary pupils nationwide with Skye’s one to one maths tutoring
Watch Skye in actionGeometry – position, direction and coordinates KS2: Year 4
In the national curriculum for maths in England, the statutory requirement is as follows:
Pupils should be taught to:
- describe positions on a 2-D grid as coordinates in the first quadrant
- describe movements between positions as translations of a given unit to the left/right and up/down
- plot specified points and draw sides to complete a given polygon.
The non-statutory notes and guidance suggests:
Pupils draw a pair of axes in one quadrant, with equal scales and integer labels. They read, write and use pairs of coordinates, for example (2, 5), including using coordinate- plotting ICT tools.
Geometry Year 4 lesson ideas
The objective that will be covered in this lesson will be to describe positions on a 2-D grid as coordinates in the first quadrant.
It is here that pupils need to be taught explicitly which is the X-axis and which is the Y-axis, and that when looking at coordinates we first look to the X-axis and then the Y-axis. As mentioned in the beginning, I am against ‘across the corridors and up the stairs’ due to this turning out to not be true when other quadrants are used.
Should you feel the need to think of another way to give meaning then I much prefer making pupils aware that as <x> has lines that cross over one another, the X-axis goes across the page. I would be clear in my explanation that it can go across to the left and to the right of the page.
Once pupils are comfortable with this idea, the first thing that they should do is to describe coordinates using this understanding. The I, we, you model is an effective one to use here along with you speaking aloud your thought processes.
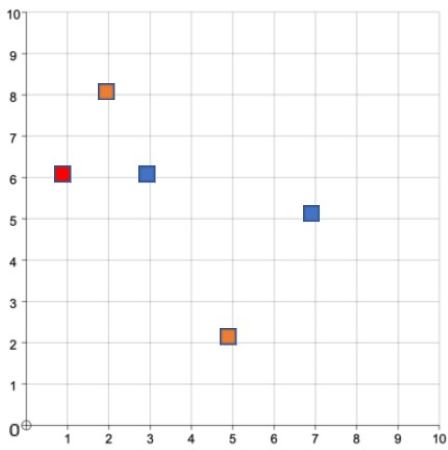
Take the red square. When looking at the ‘I’ section of the process I would say something like the following.
‘I know that to describe coordinates accurately I need to look at the X-axis first. Knowing that the X axis is the horizontal axis, I start at the origin (I put my finger on 0,0) and go across the X axis until the shape I want to describe is directly above me. (I go across one space). I can see that the red square is directly above me and I went across to one. The X coordinate is one. What is the X coordinate? (pupils respond with 1 and I write this on the board). Now I can look at the Y-axis, the vertical axis. Staying on one in the X-axis, I go up with my finger until it comes to contact with the shape. (I do this). I then move my finger to the Y axis at the same point to see the other coordinate. The Y coordinate is 6. What is the Y coordinate? (pupils respond with 6 and I write this on the board). The coordinate for the red square is 1,6. What is it? Pupils respond with 1, 6.’
In the ‘we’ part I may get pupils to tell me what it is that I need to do and use questions to ensure that all pupils are being attentive. Once I am happy that the majority of the class are comfortable with this, the final ‘you’ is given to the pupils to do independently.
Here I would expect pupils to work in silence and write the answer on a mini-whiteboard. This way, before setting them off for an independent task, I can ensure that pupils know how to do it. It also enables me to see who may need some more modelling before they attempt the independent task.
Once I have seen the board, I would get the pupils to create a success criteria and have this on view (or premade) which acts as a scaffold for pupils.
Geometry Year 4 word problems
There would not be ‘word problems’ as such that would go beyond what you would see in a simple reasoning and problem solving question.
Geometry Year 4 reasoning and problem solving
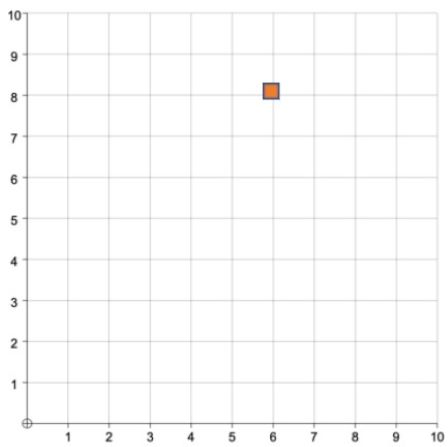
Shannen Doherty says that the coordinate of the orange square is 8,6. Cindy Katzz says it is at 6,8. Who is correct and why?
This is a useful reasoning problem to show at this early stage of reading coordinates. It can help children cement the order in which to look at the axis by getting them to look at a correct example and an incorrect example.
I would expect pupils to explain why Cindy is correct but also why Shannen cannot be right.
Geometry – position, direction and coordinates KS2: Year 5
In the national curriculum for maths in England, the statutory requirement is as follows:
Pupils should be taught to:
- identify, describe and represent the position of a shape following a reflection or translation, using the appropriate language, and know that the shape has not changed.
The non-statutory notes and guidance suggests:
Pupils recognise and use reflection and translation in a variety of diagrams, including continuing to use a 2-D grid and coordinates in the first quadrant. Reflection should be in lines that are parallel to the axes.
Geometry Year 5 lesson ideas
Pupils in Year 5 will continue to work in the first quadrant, though they are expected to do more sophisticated work within it, namely looking at translation and reflection.
It is important to note that position and direction only gets 1-2 weeks worth of instruction time and so it is a real possibility that it has been 9-12 months since pupils learnt this in Y4.
Depending on other curriculum choices, it is possible to space out this practise in other subjects such as science and geography.
Lesson: Translation on the first quadrant
Pupils need to know that translation does not result in the shape changing in size or orientation, only its position on the plane.
From experience pupils mainly fall down at understanding that if the bottom left vertex is being translated to a certain part on the plane that the left vertex must then end up there and no other.
To begin the lesson, I would first of all ask pupils to find coordinates for all four vertices so that this key understanding is spaced throughout time, meaning it will likely be remembered for longer.
Many schemes of work want pupils to be able to translate 2d shapes both vertically and horizontally at the same time (translate the square 3 to the right and 2 up) and so much instruction given by the teacher involves teaching this from the start. I do not think that this is the right approach.
While there may be many pupils in our classes who could cope with this, I am interested in ensuring that all pupils are able to access the curriculum.
Therefore, I consider the first full hour of translation instruction to be considered as three 20-minute lessons.
The first 20 minutes focus on moving the shape across the X-axis (this reinforces that the x-coordinate comes first). Secondly, 20 minutes on translating it on the Y axis.
Assuming my assessment for learning has not picked up major issues, I would combine these in the last 20 minutes.
I would begin by explaining that I want to translate the square 4 squares to the right on the X axis.
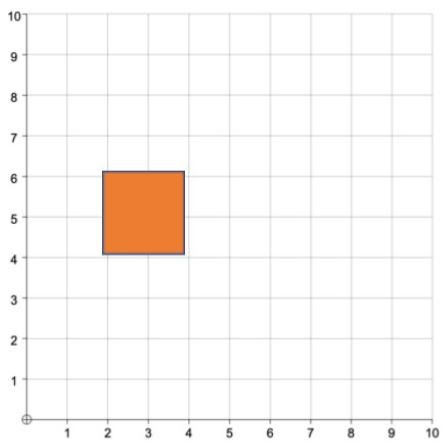
Next, I would circle all four vertices and move in a clockwise order as I ‘jump’ 4 squares to the right and draw circles at these points.
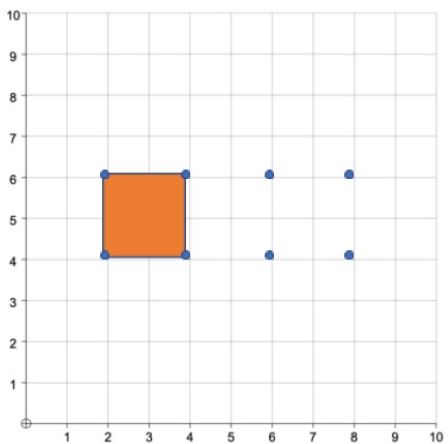
After this, I would get pupils to tell me what the coordinates of the moved points are,
before comparing the original coordinates with the new ones. Through questioning, pupils would see that the first coordinate has increased by 4 but the Y coordinate has remained stable. I would then tell pupils that I must complete the square.
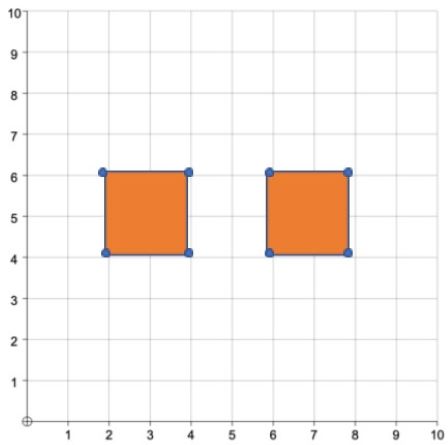
After this, pupils will have time to practise translating the square to different points on the X -axis, including going to the left; then I would explain that we will look at translating a shape up and down the Y axis following much of the same process as outlined above.
The only difference is that I would ask pupils to predict how the coordinates when translated on the Y-axis will be different to the original coordinates.
Here I am hoping that they will conjecture that the x-coordinates will remain the same, but the ordinates or y-coordinates will differ. We could then seek out to investigate whether this is true or not.
Once pupils are comfortable at translating a shape horizontally or vertically, only then would I look to translate a shape in both directions e.g., translate the square 3 to the right and 2 up.
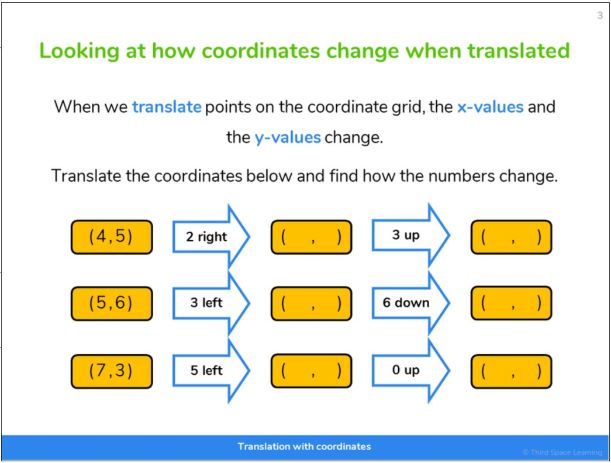
While the same result will be achieved if you translate the shape on the Y-axis first and then the X-axis, for consistency’s sake I would tell pupils to always translate across the X-axis first.
I would then explicitly model what this looks like by taking one vertex and ‘jumping’ to the right three squares and then ‘jump up’ two squares. I would do this vertex by vertex and then write the coordinates down for the translated shape.
We could then check whether their predictions were right and that both the X and Y axis coordinates changed as a result of translating the shape.
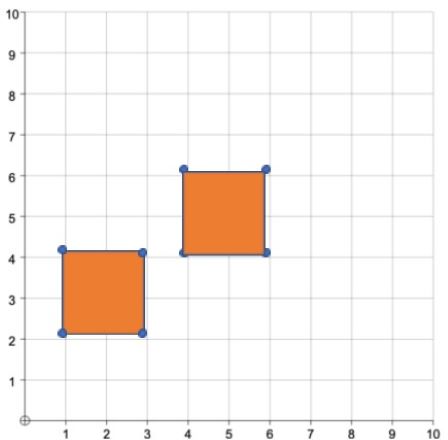
It should be noted that in this first lesson, my choice to keep the square a constant was a deliberate choice to reduce the intrinsic load of the task. After this lesson, I would move to different shapes, both regular and irregular, and in a variety of rotations.
Geometry Year 5 word problems
There would not be ‘word problems’ as such that would go beyond what you would see in a simple reasoning and problem-solving question.
Geometry Year 5 reasoning and problem solving
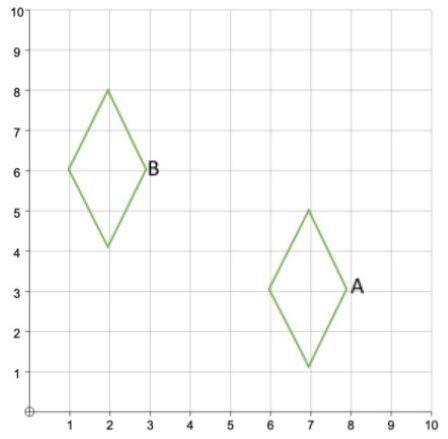
A typical problem solving activity would be like the one below. This increases the challenge over previous questions as pupils are expected to understand that they need to work out what the original translation is from point A to point B and then apply this to the rest of the shape.
Q: Translate the shape so that point A is at point B.
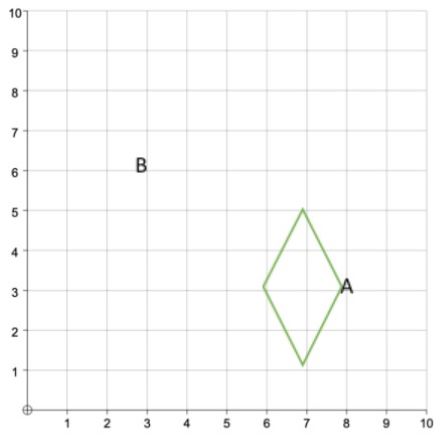
The graph below shows how pupils may wish to tackle such a problem.
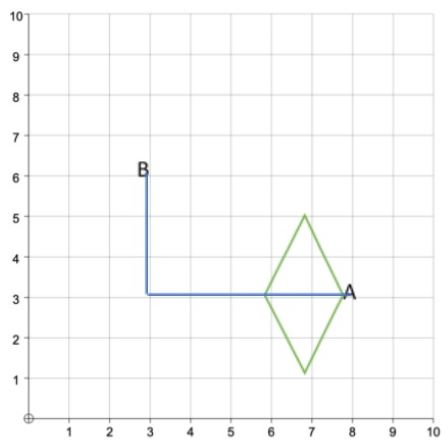
By tracking how point A got to point B (note that this is not the only way) the translation is revealed as 6 steps to the left and 3 steps up. This can then be applied to all the other vertices of the shape so that the pupils’ final solution is like the one below.
Geometry – position, direction and coordinates KS2: Year 6
In the national curriculum for maths in England, the statutory requirement is as follows:
Pupils should be taught to:
- describe positions on the full coordinate grid (all four quadrants)
- draw and translate simple shapes on the coordinate plane, and reflect them in the axes.
The non-statutory notes and guidance suggests:
Pupils draw and label a pair of axes in all four quadrants with equal scaling. This extends their knowledge of one quadrant to all four quadrants, including the use of negative numbers.
Pupils draw and label rectangles (including squares), parallelograms and rhombuses, specified by coordinates in the four quadrants, predicting missing coordinates using the properties of shapes. These might be expressed algebraically for example, translating vertex (a, b) to (a – 2, b + 3); (a, b) and (a + d, b + d) being opposite vertices of a square of side d.
Geometry Year 6 lesson ideas
In Year 6, pupils progress from working in the first quadrant to working up to and including four quadrants on a Cartesian grid.
Pupils will have been using negative numbers since Year 4 and it is recommended that these are revisited before they look at work in the four quadrants, especially looking at horizontal and vertical number lines.
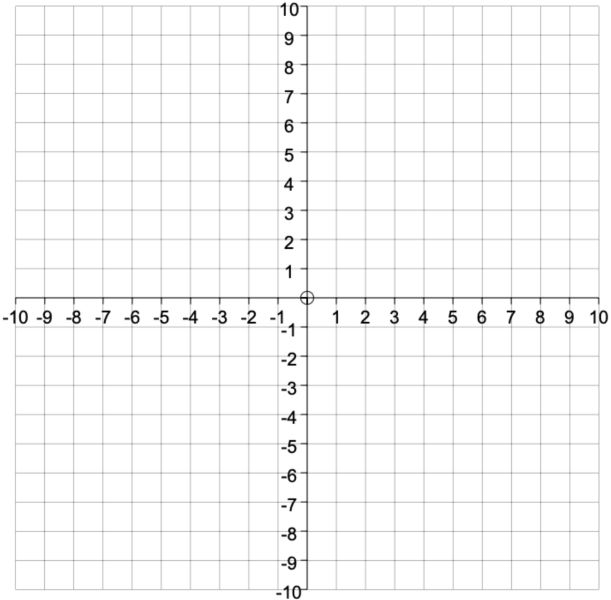
When first introducing 4 quadrants to pupils, I find it useful for pupils to see the mixture of negative/positive coordinates as can be seen below.
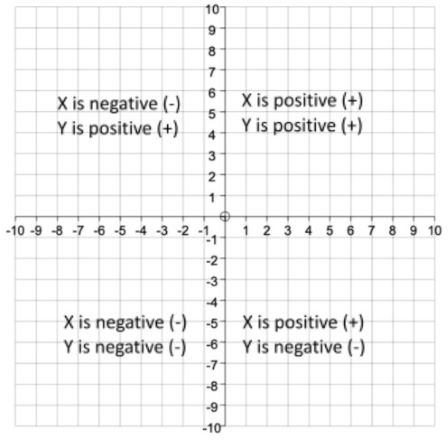
This provides a level of scaffolding for pupils when they first learn this and something that they can use throughout the lesson.
First, I would have plot points in the 4 quadrants and get pupils to identify those coordinates on an interactive whiteboard so that I can check that they are getting the answers correct. The length of time spent on this will depend on how well pupils are performing at the time.
Assuming that the pupils are showing a high success rate, I would then move on to get pupils to plot points at certain coordinates looking at all 4 quadrants.
I would model one first in the top right quadrant and call coordinates for the pupils to plot themselves. A laminated A3 axis with four quadrants is useful for this. Proceed clockwise, stopping after one to check for pupils’ understanding.
Finally, I would get them to draw a variety of shapes that cross at least two quadrants to cement working within them before looking at translation and reflection in later lessons.
Geometry Year 6 word problems
There would not be ‘word problems’ as such that would go beyond what you would see in a simple reasoning and problem-solving question.
Geometry Year 6 reasoning and problem solving
Below is an example question:
Triangle 2 is a reflection of Triangle 1. Use the information in the question to find the missing coordinates for points A, B and C.
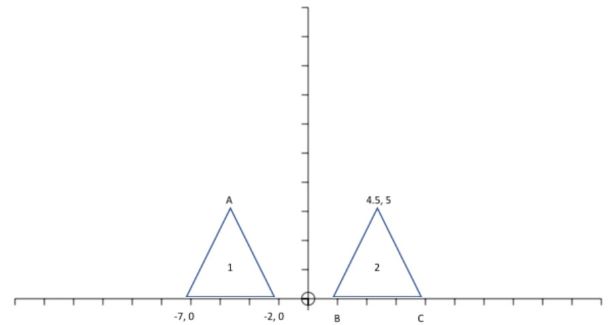
This is a typical problem that Year 6 pupils should solve. They need to use their knowledge and understanding of negative numbers, coordinates and reflection to be able to solve this problem efficiently.
From the get go we need to tell pupils that they cannot ‘estimate’ what the coordinates are or get there through counting by the origin line. They need to use mathematical reasoning and recognise in this instance that the y-axis acts like a mirror line.
Looking at what is the same and what is different, a hark to variation theory, is a good place to start here. Looking at point A, we can see that the height is the same as the reflected shape.
As the Y-axis refers to the height, we can deduce that they would share the same Y coordinate. Indeed, we can see that across B and C they are the same height, as the other bottom left and right vertices of triangle 1.
A = ___ , 5
B = ___ , 0
C = ___ , 0
For the X coordinate, this will depend on pupils’ understanding of negative numbers. Pupils may have been taught that negative numbers are a reflection of positive numbers and are equidistant from 0. They will be able to solve the coordinates without too much difficulty as numbers in the coordinates are simply reversed.
A = – 4.5 , 5
B = 2 , 0
C = 7 , 0
Looking for some more ideas of how to do this? You can find plenty of free resources and geometry: position, direction and coordinates KS2 worksheets on the Third Space Learning maths hub. You may also find our blog, What Are Vertices, Faces and Edges?, useful to pair alongside this topic!
For guidance on other KS2 subjects, check out the rest of the series:
- Teaching Decimals KS2
- Teaching Place Value KS2
- Teaching Fractions KS2
- Teaching Percentages KS2
- Teaching Statistics KS2
- Teaching Ratio and Proportion KS2
- Teaching Multiplication KS2
- Teaching Division KS2
- Teaching Addition and Subtraction KS2
- Teaching Geometry – Properties Of Shapes KS2
Looking to get ahead on other KS2 maths topics?
We have the lowdown from expert primary teachers on all the trickiest KS2 maths concepts to teach, including teaching times tables, telling the time, as well as the long division method and the long multiplication method.
DO YOU HAVE STUDENTS WHO NEED MORE SUPPORT IN MATHS?
Skye – our AI maths tutor built by teachers – gives students personalised one-to-one lessons that address learning gaps and build confidence.
Since 2013 we’ve taught over 2 million hours of maths lessons to more than 170,000 students to help them become fluent, able mathematicians.
Explore our AI maths tutoring or find out about a primary school maths tutor for your school.
