GCSE Tutoring Programme
Our chosen students improved 1.19 of a grade on average - 0.45 more than those who didn't have the tutoring.
In order to access this I need to be confident with:
Segment of a circle Circles, sectors and arcs Parts of a circleThis topic is relevant for:

Constructions
Here we will learn about constructions, including how to draw accurately using a pencil, a ruler and a pair of compasses.
You can also download the following free constructions resources all suitable for those following Edexcel, AQA or OCR exam boards:
What are constructions?
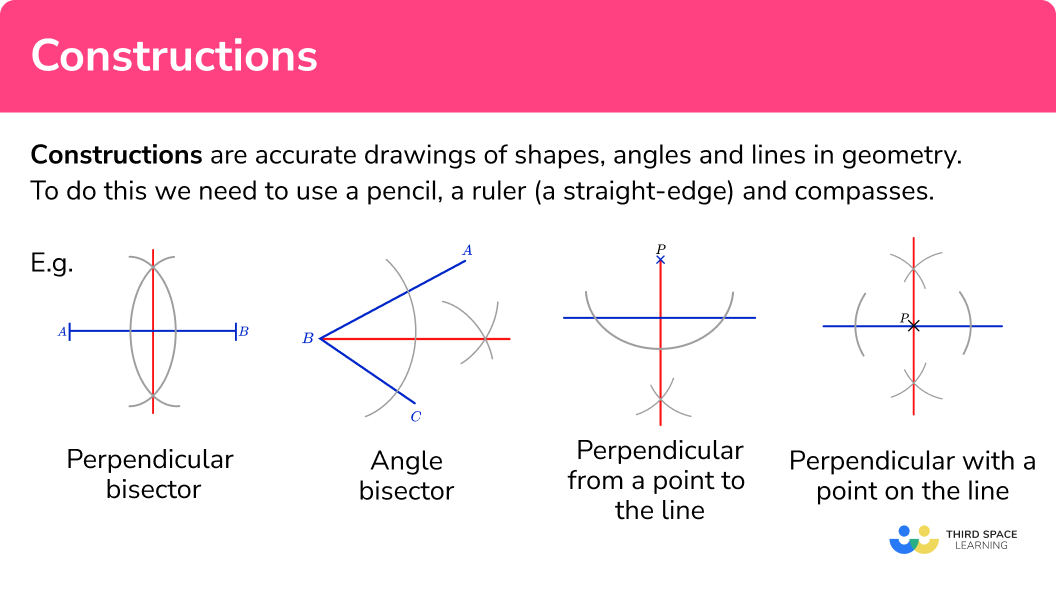
Constructions are accurate drawings of shapes, angles and lines in geometry.
To do this we need to use a pencil, a ruler (a straight-edge) and compasses.
The basic constructions are perpendicular bisector and angle bisector.
In an exam you may have to construct and interpret an angle bisector, a line bisector or distance from a point.
Step-by step-guide: Perpendicular bisector
Step-by-step guide: Angle bisector
Perpendiculars can also be constructed for a point and a given line.
Step-by-step guide: Constructions between points and lines
Other geometric constructions include how to draw a regular hexagon.

Step-by-step guide: How to draw a hexagon
The compass constructions can be applied on the same diagram. For example a 60 degree angle can be constructed and used to construct a 30 degree angle.

Similarly a 90 degree angle can be constructed and used to construct a 45 degree angle.

Step-by-step guide: How to construct a 30, 60, 45, 90 degree angle
See also: Constructing triangles
What are constructions?
Constructing regions
A locus (loci is plural) is a collection of points that have the same properties. We can use them to accurately construct lines and shapes. We can solve problems that involve intersecting loci, which require use to locate a region. To construct regions there are four ruler and compass constructions we must know:
· Locus of all points around a point or a line.
· Perpendicular Bisector
· Perpendicular Bisector from a point
· Angle Bisector
E.g.
A hospital is going to be built.
It must be no more than 10km from Town A and no more than 8km from Town B.
1cm represents 2km.
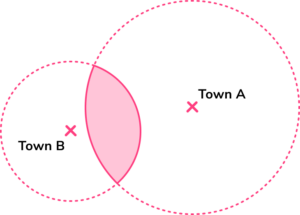
Shade the region on the diagram where the stadium can be built.

Solution:
Step 1 – draw the locus of points 10km from Town A.
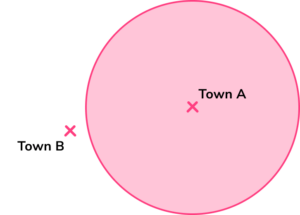
Step 2 – draw the locus of points 8km from Town B.

Step 3 – shade the region where the two circles intersect. These are the points that are no more than 10km from Town A and no more than 8km from Town B.
E.g.
Here is a scale drawing of a garden.
The scale is 1cm to 2m.
A water feature is going to be placed in the garden.
The feature must be closer to AB than BC.
The feature must be less than 14m from D.
Shade the region where the water feature can be placed.

Solution:
Step 1 – construct an angle bisector to show the locus of points equidistant from AB and BC.
Step 2 – draw the locus of points 14m from point D.
Step 3 – shade the region that shows the points that are closer to Ab than DC and less than 14m from point D.
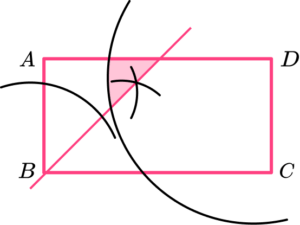
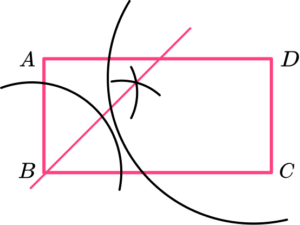
How to construct a perpendicular bisector
In order to construct the perpendicular bisector of a line segment:
- Use compasses to draw an arc.
- Use compasses to draw a second arc, intersecting the first arc.
- Join the 2 points where the arcs intersect.
Explain how to construct a perpendicular bisector
Constructions worksheet
Get your free constructions worksheet of 20+ questions and answers. Includes reasoning and applied questions.
COMING SOONConstructions worksheet
Get your free constructions worksheet of 20+ questions and answers. Includes reasoning and applied questions.
COMING SOONConstructions examples
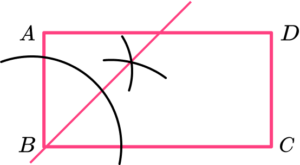
Example 1: perpendicular bisector
Construct a perpendicular bisector of the given line AB:

- Use compasses to draw an arc.
Open the compasses to about three-quarters of the length of the line.
Put the point of the compasses on one of the endpoints of the line.
Draw an arc.

2Use compasses to draw a second arc, intersecting the first arc.
Keeping the compasses the same, draw another arc from the other end of the line.

3Join the two points where the arcs intersect.
Using a straight-edge (a ruler), join up the two points where the arcs intersect each other.

The new line is the perpendicular bisector of the original line segment AB.
You can check that the new line goes through the midpoint of the line segment AB by using a ruler to measure. The line AB should have been cut into two equal halves at a right angle.
Example 2: angle bisector
Construct an angle bisector of angle ABC:

Set your compasses to a length that is less than the shortest arm. Putting the point of the compasses on B, draw one arc going through both AB and BC.

Put the point of the compasses on the point where the first arc crossed AB and draw an arc. Keep the compass on the same setting. Repeat by putting the point of the compasses on the point where the first arc crossed BC and draw an arc. These two arcs need to intersect.

Using a straight-edge – a ruler, join up the point where the arcs intersect each other with the vertex B.

The new straight line is the angle bisector of the original angle ABC.
You can check that the new straight line bisects the angle ABC by using a protractor to measure. The angle ABC should have been cut into two equal angles. The two new angles are congruent.
Example 3: from a point to a line
Construct a line from point P perpendicular to the line.

Put the point of the compasses on the original point P.
Draw an arc that crosses the original line in two places.

Put the point of the compasses on a point where the arc crosses the line and draw an arc. Keep the compasses on the same setting. Repeat with the second point where the arc crosses the line; drawing another arc to intersect the arc just drawn.

Using a straight-edge (a ruler), join up the point where the arcs intersect each other and the original point P.

The new line is perpendicular to the original line segment. You can check if the lines meet at a right angle.
Example 4: from a point on a line
Construct a perpendicular line passing through given point P.

Put the point of the compasses on the original point P.
Draw an arc that crosses the original line in two places.

The compasses will need a wider setting. Put the point of the compasses on a point where an arc crosses the line and draw arcs on both sides of the line. Repeat with the other point where an arc crosses the line; drawing another pair of arcs to intersect the arcs just drawn.

Using a straight-edge (a ruler), join up the two points where the arcs intersect each other. The new line should go through the original point.

The new line is perpendicular to the original line segment. You can check if the lines meet at a right angle.
Example 5: draw a hexagon
Construct a hexagon:
Use compasses to draw a circle and mark the centre point with a cross.

Keep the compasses set the same and make a starting mark and then draw arcs. Keep moving the compasses on until there are 6 marks on the circumference of the circle.

With a straight-edge draw lines between the points where the arcs cross the circle.

Example 6: construct a 60 degree angle
Construct a 60^o angle:
With a pencil and a straight-edge draw a straight line.

Use compasses centered on one end of the line, draw an arc.

Keep the compasses at the same setting. The new arc should cross the first arc.

Use a straight-edge to join the end point used in step 2 to the intersection of the two arcs.

The angle should be 60^o. You can use a protractor to check.
Example 7: construct a 30 degree angle
Construct a 30^o angle:
Follow the steps in Example 6 to construct a 60 degree angle.
Angle ABC is 60^o .

Place the point of your compasses at A and draw an arc. Keep the compasses at the same setting and repeat placing the point at C and drawing another arc. Using a straight-edge, join up the point where the arcs intersect each other with the vertex B.

The 60 degree angle has been bisected into two equal angles, both 30 degrees. You can check by using a protractor to measure.
Example 8: construct a 90 degree angle
Construct a 90^o angle:

.Set your compasses to about three-quarters of the length of your line. Place the point of your compasses on one endpoint of the line and draw an arc.
Keeping the compasses set at the same setting, draw another arc from the other endpoint. Finally use a straight-edge to join the two intersections of the arcs.

The new line is the perpendicular bisector of the original line segment.
Example 9: construct a 45 degree angle
Construct a 45^o angle:
Follow the steps in Example 8 to construct a 90 degree angle.

Place the point of your compasses at the centre and draw an arc. Place the point of your compasses at the intersection and draw an arc. Keep the compasses at the same setting and repeat.
Place the compasses at the other intersection and draw another arc. Using a straight-edge, join up the point where the arcs intersect each other with the centre.

The 90 degree angle has been bisected into two equal angles, both 45 degrees. You can check by using a protractor to measure.
Example 10: all three sides
Draw the triangle ABC accurately:

Use a pencil and a ruler to draw the base. It is usually easiest to use the longest side.

Open the compasses to 5 cm . Place the point on point A and draw an arc.

Open the compasses to 3 cm . Place the point on point B and draw an arc. This second arc should cross the first arc. Label this point C.

Complete the triangle by joining the point C, where the arcs intersect, to point A and point B.

Example 11: two angles and the included side
Draw the triangle ABC accurately:

Use a pencil and a ruler to draw the base.

At point A use a protractor to measure the angle 50^o , make a mark and then draw a straight line from point A through the mark. Make this line long.

At point B use a protractor to measure the angle 35^o , make a mark and then draw a straight line from point B though the mark.

Make sure that the two lines interact to form the triangle.

Example 12: two sides and the included angle
Draw the triangle ABC accurately:

Use a pencil and a ruler to draw the base.

At point B use a protractor to measure the angle 40^o , make a mark and then draw a straight line from point B through the mark. Make this line long.

Open the compasses to 5 cm . Place the point on point B and draw an arc. This second arc should cross the line drawn in step 2 .

Join the intersection of the arc and the line with point A.

Common misconceptions
- The construction arcs must not be removed
The arcs drawn should be drawn lightly so can be adjusted if needed but they must be visible in your final answer. This is to show that you have used the correct method to draw the perpendicular bisector accurately.
- The pencil should be sharp
A sharp pencil helps your diagram to be accurate. Using a small pencil in compasses can also be helpful.
Practice constructions questions
1. Construct a perpendicular bisector of the line MN.


The construction must be made with compasses kept to the same setting for both arcs. The construction arcs must be seen. The perpendicular should be drawn with a straight edge.
2. Construct an angle bisector of XYZ


The construction must be made with compasses kept to the same setting for the arcs. The construction arcs must be seen. The line should be bisecting the original angle Y.
3. Construct a perpendicular from point P on the line:


The construction arcs should be made with compasses and be visible. The final line should go through the original point and be drawn with a straight-edge.
4. Construct an isosceles triangle with sides 8 cm, 6 cm and 6 cm


The longest side should be 8 cm . Compasses should be used to make the arcs, and they should be clearly seen. The other two sides are the same length; 6 cm.
5. Construct a triangle ABC, with AB is 6 cm , angle BAC is 60^o and angle ABC is 45^o.


Check the labelling of the triangle. The side AB should be 6 cm. The angle at A should be 60^o and angle at B should be 45^o.
6. Construct a triangle PQR, with PQ is 6 cm , QR is 5 cm and angle PQR is 60^o.


Check the labelling of the triangle. The side AB should be 6 cm . The angle at A should be 60^o and angle at B should be 45^o.
Constructions GCSE questions
1. Use a ruler and compasses to construct the perpendicular from point P to the line AB. You must show your construction lines.

(2 marks)

for the first arc(s) crossing the line centered on P.
(1)
for the perpendicular with all construction arcs.
(1)
2. In the space below, use a ruler and compasses to construct an equilateral triangle with sides 6 cm.
You must show all your construction lines.
One side of the triangle has already been drawn for you.

(2 marks)

for the construction arcs.
(1)
for the completed equilateral triangle.
(1)
3. The diagram shows the plan of a garden.

A statue in the garden is equidistant from PS and from SR.
The statue is exactly 6 m from Q.
On the diagram, mark the position of the statue with a cross (\times).
(3 marks)

for the angle bisector of PSR.
(1)
for arc of circle radius 6 cm centre Q.
(1)
for the correct point.
(1)
Learning checklist
You have now learned how to:
Still stuck?
Prepare your KS4 students for maths GCSEs success with Third Space Learning. Weekly online one to one GCSE maths revision lessons delivered by expert maths tutors.

Find out more about our GCSE maths tuition programme.