

How Algebra Manipulatives Can Transform Engagement With Your Secondary Maths Lessons
Algebra manipulatives have increased in popularity in recent years and in this blog, maths expert Christine Norledge explains how manipulatives have earned their place in the secondary classroom. Christine shares her insights, tips and lesson activities to transform engagement in secondary maths lessons through the use of manipulatives.
What are algebra manipulatives?
Algebra manipulatives are concrete objects designed to support learners to understand abstract concepts in algebra. Manipulatives support meaning-making and explicit teaching of links between different mathematical concepts.
Some hands-on manipulatives that are typically used to model number concepts and processes are useful for extending to algebra, however there are also algebra-specific manipulatives.
Examples of algebra manipulatives
- Algebra tiles, which are the most popular algebraic manipulative, and the main focus for this blog;
- Algebra blocks, which include solid forms and extend ideas using algebra tiles to three dimensions, allowing for representations of order three polynomials (cubics);
- Cuisenaire rods;
- Place value and base ten blocks.
There are plenty of tiles available on the market, all with slightly different branding (Hand2Mind, Didax, and so on). These can be expensive, and I’d argue that a homemade set of algebra tiles is perfectly sufficient for most activities. You can find our our free printable algebra tile templates to download below.
There are also options such as balance scales to model solving equations. I’m a big fan of the old-fashioned pan scales as you can just pile stuff into the containers and they’re surprisingly accurate!

FREE GCSE Algebra Tiles Printable Templates
Includes quick guide to and printable templates of Algebra tiles to help your students to develop a deeper understanding of the concepts of Algebra.
Download Free Now!How do you use algebra manipulatives?
Algebra manipulatives are no different to other maths manipulatives. They should (generally) be viewed as a step to developing understanding of new concepts, rather than an end-goal method.
Using an algebra tile model for most algebraic problem solving would be very inefficient or often impossible, particularly when the numbers become large. However, algebra manipulatives and algebra tile models in particular are fantastic for providing a concrete handle on some very abstract concepts.
I first came across algebra tiles while desperately trying to teach a group of reluctant Year 10s how to complete the square. I was immediately sold, despite the fact that none of us had ever used algebra tiles before this lesson. Being able to model and physically “complete a square” was so helpful in demonstrating what they were actually trying to do while wading their way through some complex algebra. There’s more on this in the section ‘using algebraic manipulatives for completing the square.

Meet Skye, the spoken AI tutor making maths success possible for every student.
Built by teachers and maths experts, Skye uses the same pedagogy, curriculum and lesson structure as our traditional tutoring.
But, with more flexibility and a lower cost, schools can scale online maths tutoring to support every student who needs it.
Watch Skye in actionWhat are the benefits of using manipulatives to teach algebra?
In addition to providing visual models for some of the most abstract concepts that GCSE students come across, using manipulatives to teach algebra also has the main benefit of enhancing links between topics, and crucially, linking the more concrete world of number to the abstract world of algebra.
The benefit of using Cuisenaire rods as an algebra manipulative
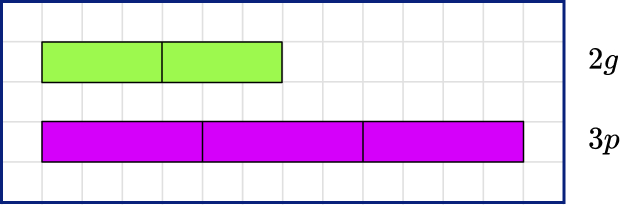
When students first come across writing algebraic expressions, Cuisenaire rods can be used so that students can work from a position of familiarity. Even if your students aren’t already familiar, the ideas below can work effectively to link the concrete world of number to the abstract world of algebra.
Initially, students can begin building expressions and, through discussion, we co-develop the notation of 2g being a shorthand for 2 green blocks, and so on. One interesting benefit of using manipulatives to explore this is that when I’ve run this lesson with Year 7s, while there’s a mixture of unsimplified notation, such as 2 x g, g x 2 and so on, I’m yet to come across a pupil who’s written g^2 , as they are often wont to do when just presented with letters in the abstract!
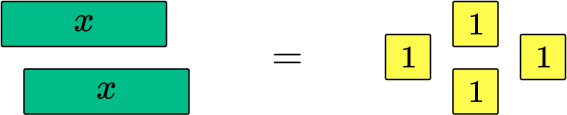
Once students are happy with these ideas, you can then start to build equivalent expressions. Ask “what would we need to add to the top to make it equal in length to the bottom?”
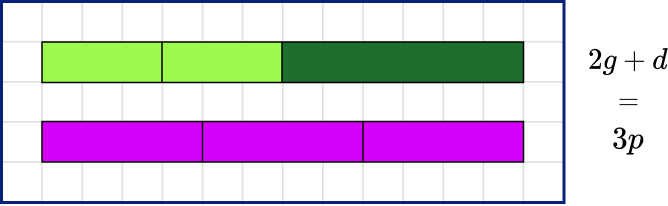
There is plenty of rich discussion to be had here around notation, expressions, equations, the function of the equals sign, and the beginnings of collecting like terms.
Using mini-whiteboards is a great way for learners to collect and record ideas. You can read more about these ideas in the links at the bottom of this article.
What are algebra tiles?
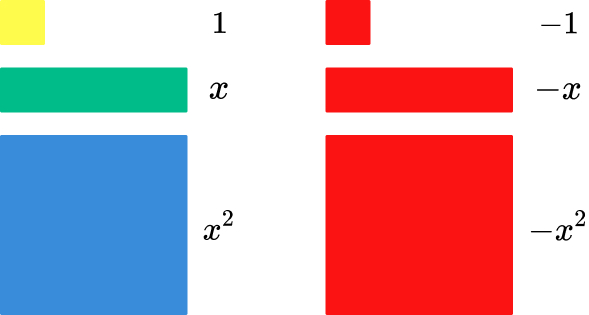
Algebra tiles are really useful for representing most pure algebraic concepts at GCSE. A standard set of algebra tiles contains:
- A small square block: 1 (yellow)
- A rectangular bar block: x(green)
- A large square block: x^2 (blue)
- Copies of these shapes in red to represent negative quantities.
Some people choose to label the tiles and some leave them blank. This is generally down to personal preference and preferences of your learners.
Some sets of tiles are double-sided, so one side contains the positive colour-coding, and the other is all coloured red. This is also an option if making your own, and can be a useful way of making homemade tiles a bit less flimsy!
I’d caution against just picking up a cheap set of tiles on Amazon. The most crucial thing with algebra tiles, whether bought or homemade, is that the side length of the 1 square must not be an exact factor of the length of the x tile. For example, if exactly five yellow 1 tiles fit the length of the green x tile, the fact that x=5 leads to misconceptions when using the model. Cheaper tiles often don’t take this into account.
How do you use algebra tiles?
Algebra tiles are used to model algebraic expressions and equations. Learners use the tiles to represent the problem, then solve the problem by moving, manipulating, adding or removing tiles in some way.
Algebra tiles are best introduced early on, ideally pre-algebra, so before they’re needed for forming expressions.
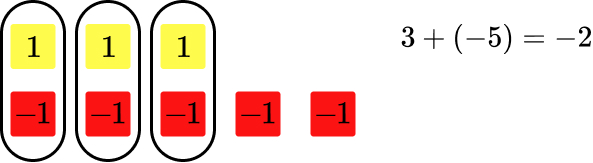
A key idea at the heart of algebra tiles is the idea of the zero pair. This a concept that students frequently meet when using double-sided counters to represent directed number calculations. In fact, there’s no reason why square 1 algebra tiles could not be used instead of the standard round counters when teaching directed numbers.
Briefly, a zero pair is a set of two numbers, which, when added together, equal zero. This is the number and its additive inverse.
It’s frequently argued that the model is ineffective without this notion of zero pairs. I’d suggest that, although you’d really want algebra tiles embedded as a whole-school approach from Year 7 (or before), with students used to the ideas of zero pairs, the models can still be useful as an individual class teacher with limited groundwork. It’s just not going to be as effective as working “properly” with zero pairs.
How can algebra manipulatives be used for different topics?
Using algebraic manipulatives for counting and directed number
As discussed above, unit “1” algebra tiles can be used in place of double-sided counters when working with integer calculations, and this can be a great way to familiarise younger learners with algebra tiles before they’re required for working on more complicated algebra.
Using algebraic manipulatives for area models
One of the advantages of algebra tiles as a model is that they preserve the historic links between quadratic equations and their underlying geometry.
The root of the word quadratic is the Latin quadratus, meaning “square” and it is the index power that is named after the geometrical figure, not the other way round. The motivation for solving quadratic equations was often to do with calculating areas, both of abstract geometric figures and also of fields and plots of land. This leads to rather beautiful model-making when factorising quadratics, for example.

It’s important that students are comfortable with the idea that the green rectangle has dimensions 1x, where x is a variable length, and that the length of this rectangle is just a representation.
With physical manipulatives, obviously x needs some assigned length. As discussed above, making this fractional seems to alleviate some of the need to equate x with however many yellow blocks:
Using algebraic manipulatives for algebraic expressions
Once learners are happy with the concepts above, we can finally start using the tiles to actually do some algebra!
Most schemes start off with algebraic expressions. I’d probably use a mixture of the Cuisenaire rod ideas (introduced earlier in this article) and algebra tiles to teach this concept.
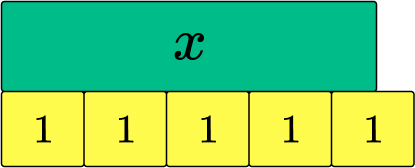
We can start just by getting learners to build different expressions, switching between the tile pictures and symbolic representation. So we can ask “what does this picture show?”
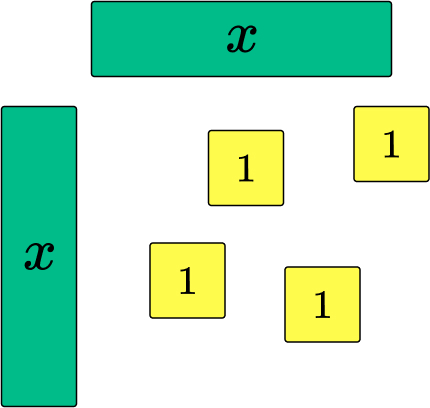
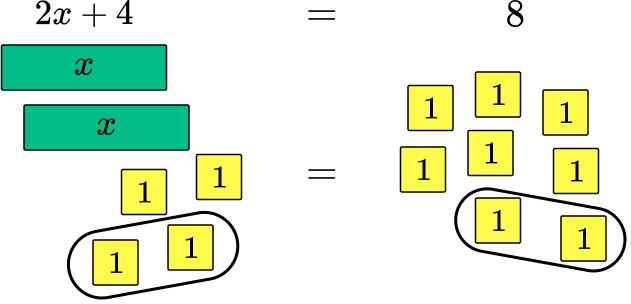
Or we can ask “find me the tiles to represent 2x + 4”. The fantastic thing about using algebra tiles here is you can physically demonstrate why 2x is different to x + 2. You can read more about this lesson in the links below.
In order to lay groundwork early on for factoring expressions, I’d start to subtly arrange my tiles (usually a whiteboard manipulative) into a rectangle “because it looks neater”.
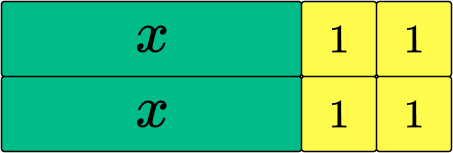
In the past, I’ve made too much of this too early on, and pushed students before they were conceptually ready for the links to expanding and factorising but dropping this in under the guise of keeping things tidy emphasises the links back to areas of squares and rectangles.
Using algebraic manipulatives for expanding brackets
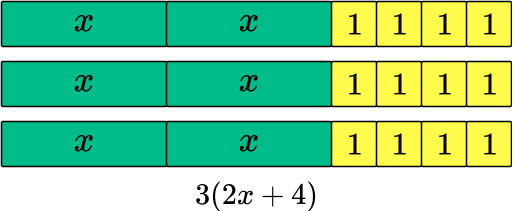
Expanding (single) brackets is really nice to model using algebra tiles, because students can physically get out and count however many lots of whatever is in the bracket – and hopefully, with enough of this going on, they’ll remember to multiply all the terms inside the bracket by the value outside!
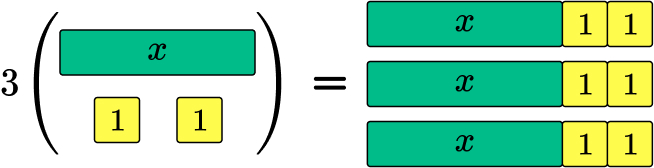
We can see that “3 lots of x + 2” gives us 3x + 6.
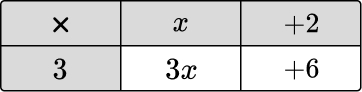
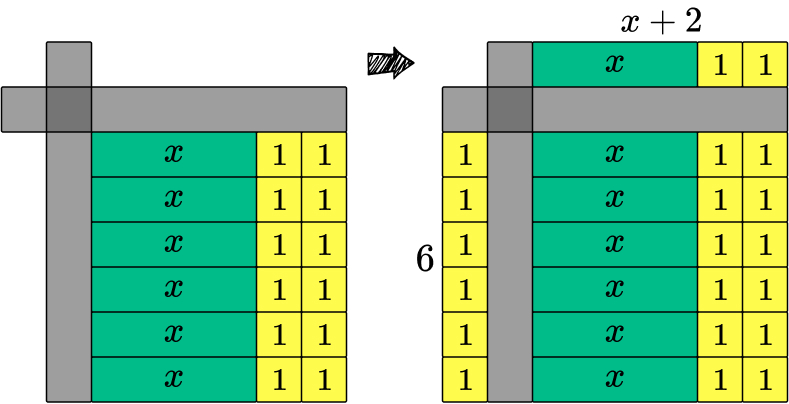
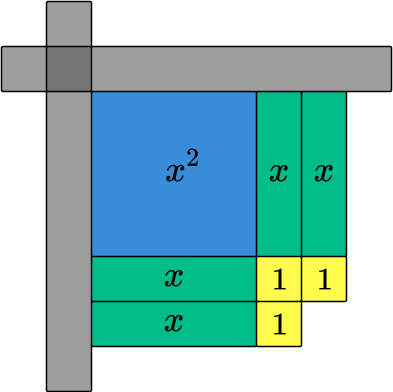
Once students are happy with this slightly woolly representation of the distributive law, we can begin to work towards this idea using a corner frame, motivating it by linking back to the “grid method” for numerical multiplication:
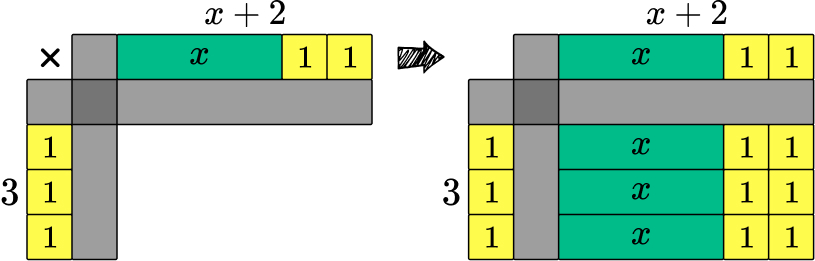
Here we can see how we step away from tile representations to a “pen and paper” method:
Using algebraic manipulatives for factoring or factorising (single bracket)
When working on factorising, a good starting place is just making identical groups. For an expression like 6x + 12, we can look at possible groupings:
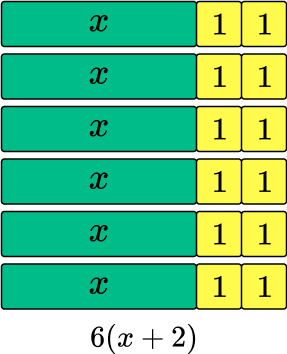
Obviously we’ve also got the superficial grouping of 1(6x + 12) – and it can be useful to get students to create this to motivate the next bit, because when they try to arrange this in bar groups as above, they produce one long bar and there’s usually not enough room on the table!
At this point we need to discuss with students that while both pictures represent the same expression, and both have a common factor removed, when we’re factorising we’re looking to remove the largest common factor, and therefore make the expression bar as short and simple as possible (compare x + 2 to 2x + 4 here).
Using a corner frame again we can build towards a grid method and away from algebra tiles:
Using algebraic manipulatives for expanding and factorising quadratic expressions
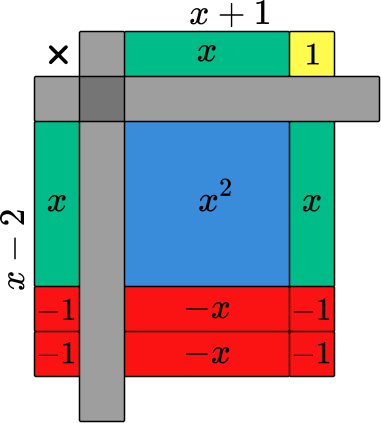
Once learners are used to the idea of a corner frame, we can extend concepts about expanding and factorising to quadratic expressions.
So something like (x+2)(x+3) we could build as:
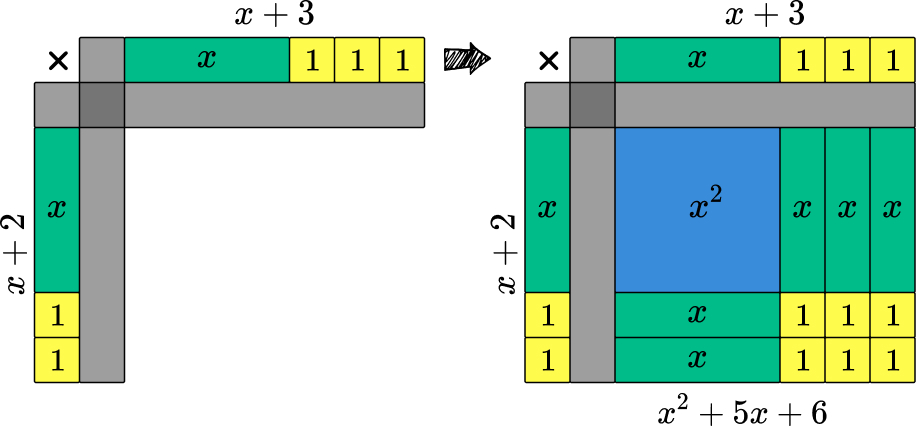
Again, we can see how this develops into a grid multiplication method, before potentially moving away from structures altogether.
When working backwards, we’re encouraging learners to arrange the blocks into a rectangle. When they’ve had plenty of practice doing this, the scaffolding of the tiles can be removed and grids introduced.

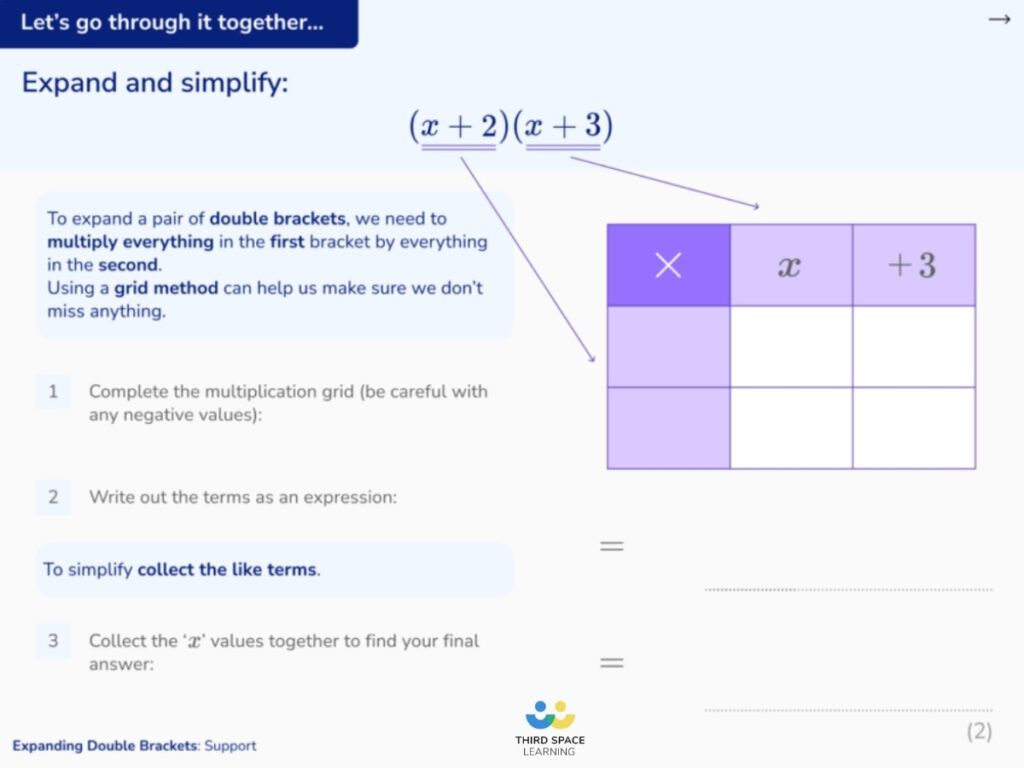
we support students’ understanding of expanding double brackets using the grid method.
The stage before this may be supported with algebra manipulatives.
Using algebraic manipulatives for completing the square
As I mentioned earlier in this article, this is paradoxically where I started – with one of the most complicated topics on the GCSE maths curriculum. However, it’s such a powerful visualisation that the group I introduced tiles with had no difficulty following the explanations despite the fact that they’d never seen algebra tiles before. Incidentally, neither had I. I ended up at algebra tiles via a random American high school teacher’s blog after some desperate Googling on teaching for understanding when completing the square!
I subsequently took the same ideas into a Year 12 maths lesson when reviewing GCSE content at the start of the course. Cue more “oh that’s why it’s called completing the square!”
So if we look at completing the square for x^2 + 4x + 3, learners get the tiles and then try to make the best square they can. We end up here:
So we can see we almost have the square with side length (x+2), but we’re short of one yellow 1 tile – what we actually have is (x+2)^{2}-1.
This motivates the “half b” method and interestingly, when this group of students sat their Year 11 mocks, on which completing the square appeared, the students who were most successful were those that drew algebra tile diagrams, with almost all getting the “half b” mark and most of them getting full marks.
Using negative tiles
So far, we’ve not touched upon negative tiles. It’s very possible to do all of the activities above using negative tiles to model negative terms. Personally, I don’t like to go too far with this as I think the idea of a negative area starts to feel problematic quite quickly. I’d prefer to develop the underlying maths concepts and bed in understanding using positive quantities where possible, then add negatives into the mix once we’ve moved away from the tiles. However, this is personal preference and a professional judgement about the students in front of me.
Using algebraic manipulatives for solving linear equations and inequalities
While a lot of algebraic manipulation can be modelled pretty effectively using just positive tiles, you really do need learners to be happy with negative tiles and zero pairs for solving equations and inequalities using algebra tiles.
Again, this is a model on the continuum of understanding. We use this to gradually develop the formal algebraic method for solving equations.
So looking at a bog-standard two-step equation like 2x + 2 = 6, we would have the following model:
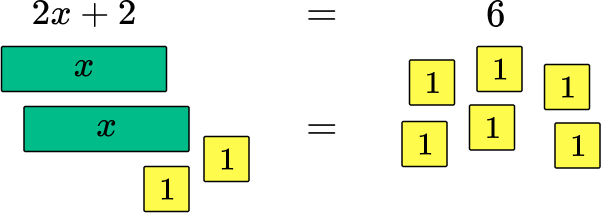
Before diving in to solve this, it’s a useful activity to add some “stuff” to each side of the equation and discuss how algebra balance is maintained. For example, we could add 2 to each side and maintain equality.
How far to take this depends on your learners – if they’re confident with directed number, you could add some zero pairs in, for example.
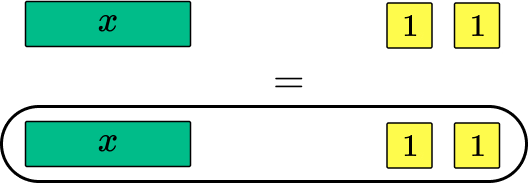
Returning to our original equation, there’s a temptation to just “remove” two of the 1 tiles from each side, leaving:
However, for the sake of further work on solving equations, it’s worth being consistent in the use of zero pairs from the word go:
Here, we’re modelling the subtraction of 2 from each side using zero pairs. Once we’ve represented these zero pairs, they can just be removed to give the picture above. We see shortly when we look at a problem involving negative terms why this use of zero pairs is helpful.
Students can usually spot at this point that if two lots of x equals 4, then one lot of x must equal 2, but they can also be encouraged to represent this visually:
These ideas extend all the way up to more complicated linear equations and inequalities (the only difference with inequalities, of course, is the sign you put in the middle!).
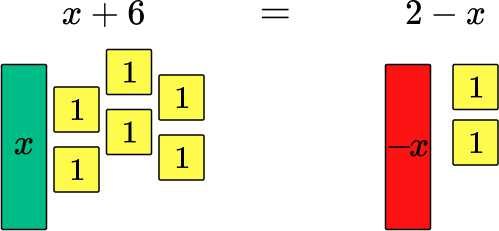
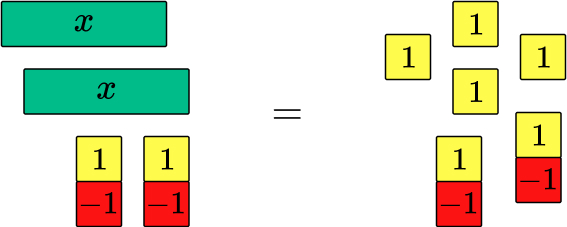
Introduce zero pairs – I’d do this in two separate stages in class, with xs and then 1s, but I’ve done both on the same diagram here for brevity:
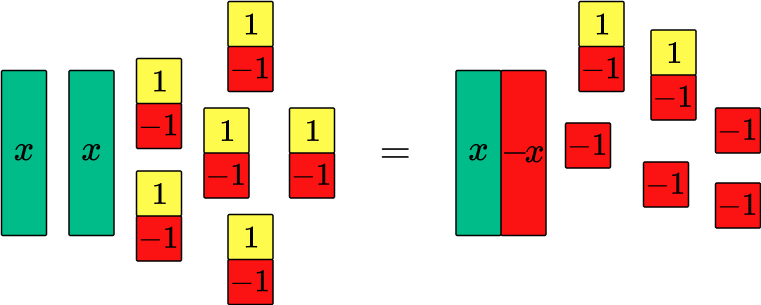
Using zero pairs deals with the tricky conceptual problem of needing to “take off a negative x tile from both sides”. Conceptually this is the same as adding an x tile to each side, and using zero pairs demonstrates the jump from the tile representation to what we’d do algebraically (“add x to both sides”).
Once zero pairs are resolved, we’re left with:
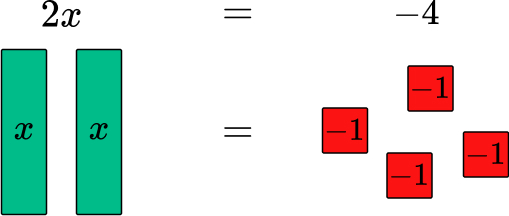
So finally, dividing out gives x=-2.
Concrete vs virtual manipulatives in classroom learning
Since I started using algebra tiles, the number of virtual manipulatives available has increased significantly. Again, you need to check that tiles are not whole multiples of each other (I found a surprising number where this wasn’t the case!).
For a high-quality free virtual manipulative, I’d recommend checking out MathsBot’s algebra tiles. This online manipulative has the ability to remove zero pairs, duplicate blocks easily, includes a corner frame (axis), allows splitting tiles for fractional and decimal quantities, and, finally, comes with a load of problems for students to attempt.
In terms of concrete vs virtual manipulatives, for my money there’s room for both in the classroom. See my table below reviewing the merits and limitations of each.
This is by no means an exhaustive list of how to use algebra tiles to teach various algebraic concepts, but is hopefully enough to give you a taster and some ideas of how to use them in the classroom to support learning.
| Concrete | Virtual | |
| Pros | Low entry level Easier to manipulate/move around and try different options | Free Easy to tidy up Easier to deal with large quantities |
| Cons | Expensive (although you can make your own for a fraction of the cost) Take longer to tidy away – and some inevitably end up on the floor! | Higher entry level (students need to learn quirks of the app) Device required for all students |
Links and further reading
Christine’s experiences using algebraic manipulatives:
Don’t forget to download your FREE algebra tiles template!
Looking for more information on manipulatives?
Manipulatives that can be used to teach algebra include: Cuisenaire rods, Dienes blocks, algebra tiles and algebra blocks. The most commonly used manipulative at secondary level is algebra tiles.
An algebra tile model is a representation of an algebraic process, such as expanding brackets, factorising quadratics or solving an equation. The model is used to develop a deeper understanding of the concepts of algebra.
The difference between an algebra tile model and a manipulative is that a manipulative is a concrete model, whereas a model can be a drawing or picture. Algebra tiles can be used either way; students can physically move a set of tiles on a surface or they can look at a model or picture presented by the teacher.
Algebra manipulation refers to a range of skills including simplifying algebraic expressions, collecting like terms, expanding brackets, factorising, and so on. These are skills that are then applied in other branches of algebra, such as solving equations or rearranging formulae.
DO YOU HAVE STUDENTS WHO NEED MORE SUPPORT IN MATHS?
Skye – our AI maths tutor built by teachers – gives students personalised one-to-one lessons that address learning gaps and build confidence.
Since 2013 we’ve taught over 2 million hours of maths lessons to more than 170,000 students to help them become fluent, able mathematicians.
Explore our AI maths tutoring or find out how a GCSE maths tutor could support students in your school.