Teaching Time & Telling The Time In Elementary School: Your NEW Fail-Safe Step by Step Technique
Learning to tell the time made easy for children in elementary school. Here is a fail-safe step by step technique for teaching time at elementary school from experienced teacher, Clare Sealy.
Learning to tell time for children is something they find particularly difficult. For the most part, this arises from the need to concentrate on two sets of different ideas at the same time. Put simply, when you’re a child, learning to tell the time puts a real strain on your working memory.
This article outlines step by step how to teach telling time to any child. It is designed for teachers teaching time to elementary children, but is also suitable for parents to follow when teaching children to tell time at home.
This article focuses on teaching telling time using analog clocks. Reading digital time is part of the curriculum, starting in the 1st grade. However, digital clocks have also become considerably more commonplace in recent years, so children will likely already have had some exposure to them, whereas analog clocks will be unfamiliar.
If you’re a teacher, make sure to check out our other teaching guides for elementary math. If you’re a parent, we have more on home learning and how to help your kids with math at home.
- Teaching Time in Elementary School
- Working memory and telling the time
- Reducing cognitive load when teaching time
- Telling time in lower elementary: Teaching the hour hand
- Telling time in lower elementary: Teaching half past
- Telling time in lower elementary: Teaching quarter past and quarter to
- Telling time in lower elementary: Teaching the minute hand
- Telling the time in upper elementary: Teaching the minutes
- Telling time at upper elementary: Teaching minutes past the hour
- Telling time at upper elementary: Teaching minutes to the hour
- If children get stuck learning to tell time
12-hour and 24-hour Time
Printable ready-to-use worksheet to help students understand 12-hour and 24-hour time.
Download Free Now!Teaching Time in Elementary School
Here’s what the elementary math curriculum states about how children’s learning to tell the time should be taught.
Teaching Time Lower Elementary
Teaching Time First Grade
- Students should be taught to tell and write time in hours and half-hours using analog and digital clocks.
- Students should work towards becoming fluent in telling the time on analog and digital clocks and recording it.
READ MORE: Math Problems For 1st Graders
Teaching Time Upper Elementary
Teaching Time Second Grade
- Students should be taught to:
- tell and write time from analog and digital clocks to the nearest five minutes, using a.m. and p.m.
- use both analog and digital clocks and record their times.
READ MORE: 2nd Grade Math Problems
Teaching Time 3rd Grade
- Students should be taught to:
- Tell and write time to the nearest minute and measure time intervals in minutes.
- Solve word problem involving addition and subtraction of time intervals in minutes, e.g., by representing the problem on a number line diagram.
READ MORE: Math Problems For 3rd Graders
Working memory and telling the time
Our working memory is the place in our brains where we do our active thinking. Generally, it can only handle about four different things at any given time. If we try to process more than that, we will likely experience cognitive overload.
Imagine going to a supermarket and not having a basket. You can carry about four things just fine. But as soon as you try to pick up any more items, you realize there isn’t room. You have to drop one of the items you were previously carrying.
Our working memory is a lot like that. Ask it to think of too many things at once and it will start dropping items.
The solution to this is to make sure we introduce the concept of time slowly, in small steps, so students’ working memories are not overloaded with too much at once.
It’s also worth making sure students are comfortable with the fundamentals before moving forward into teaching telling the time. Place value in upper elementary and lower elementary, for example, is integral to ensuring students can understand the concept of time.
Meet Skye, the voice-based AI tutor making math success possible for every student.
Built by teachers and math experts, Skye uses the same pedagogy, curriculum and lesson structure as our traditional tutoring.
But, with more flexibility and a low cost, schools can scale online math tutoring to support every student who needs it.
Find out more
Reducing cognitive load when teaching time
An easy way to cut down the cognitive load involved in learning to tell time is to separate out learning how the hour hand works and learning how the minute hand works.
It’s simple when you think about it. The hour hand counts in ones, whereas the minute hand counts in fives, and also indicates fractions. It’s inherently confusing to teach them together.
Instead of teaching time to children using both the hour and minute hand at the same time, start by teaching it using the hour hand only. When (and only when) that is securely understood, should you introduce the minute hand.
In an ideal world, the clocks in our classrooms would only have hour hands for this part of teaching. If you have the sort of clock that you can easily remove the minute hand from, then I’d do it. You’ll be amazed how easy it is to roughly tell the time by the position of the hour hand alone.
Still, whether or not you can do that, here are my top methods for teaching time in elementary school, to ensure all elementary students are proficient at telling the time.
Telling time in lower elementary: Teaching the hour hand
When teaching time in lower elementary, first make sure that children really understand that an analog clock face is just a special kind of number line.
In order to do this, write the numbers one to twelve on mini post-it notes (or similar), then display them horizontally in a line from 1 to 12, equally spaced, with a gap in between each one. Then make an arrow representing the “hand” (note: calling it a hand when it is an arrow will baffle some children!)
Next, explain that when the hand points to a number, this tells us how many hours it is. Make sure you point exactly at the number and not slightly to the left or right of it. Tell the children that instead of saying ‘three hours’ we say ‘three o’clock’.

Give the whole class their own set of post-it notes and hands and repeat this enough times on different hours until everyone can do it. This step is pretty easy, but it gets harder.
Once this is secure, model how we can use our number line to find out what time it will be one hour later. Model moving the arrow from three to four to move one hour. Then extend to two hours later and so on.
When you get to 12 and ask what time it is one hour later, explain that instead of going up to 13, we put the numbers in a circle and start back at 1.
Then move your post its into a circle, in familiar clock face style with the arrow in the middle
Again ask what is one hour later for various times, culminating in asking what is one hour later for 12 o’clock. Now students can see that it must be 1 o’clock.
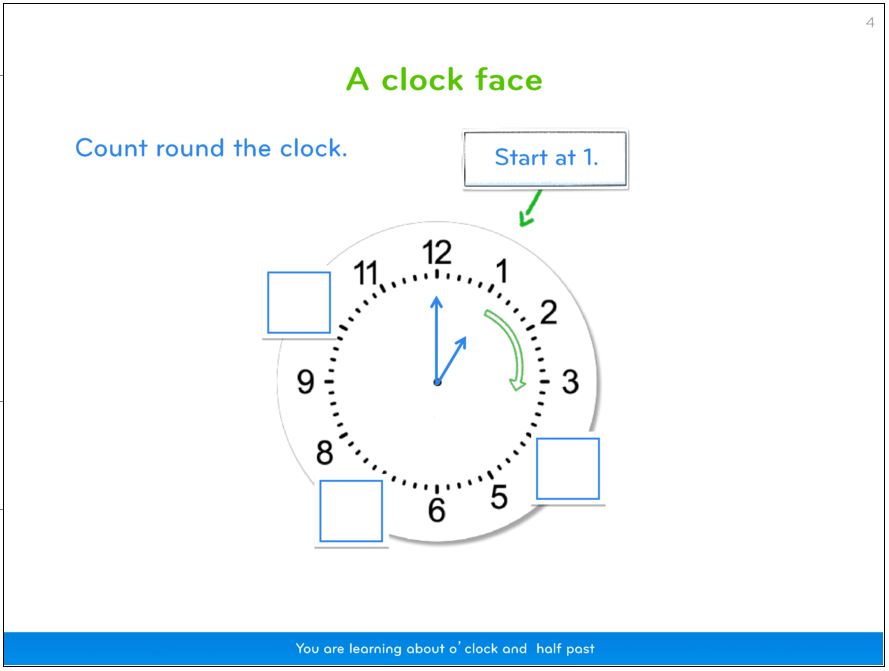
Extend this by doing an example of two hours later, three hours later, and so on, from various starting points.
At this point, you may feel your children are ready for you to explain how we can use our clock to find out what time is one hour earlier than 3 o’clock.
Notice I haven’t introduced half past at all yet for telling the time in lower elementary. I am going to wait until I am convinced everybody has really mastered using their clock as a circular number line to count on and back in whole hours to find out how many hours later and earlier something is.
I will include questions such as ‘if it is 4 o’clock now, what time was it 2 hours earlier?’ And ‘I left home at 10 o’clock and got to the store at 12 o’clock, how long did it take me?’
I will resist the temptation to rush on to half past until we can all do this!
Telling time in lower elementary: Teaching half past
If (and only if) your 1st graders are secure in their understanding of time in hours, my next step would be to introduce the concept of half past.
Going back to my horizontal number line, I will position the hand half way “past” the 2 and 3, as below:

I will explain that because the hour hand is halfway between the 2 and 3 (or half way past the 2) we say it is half past 2. This means it is half way past two hours. Repeat for various numbers.
Then, once again, rearrange your post-it notes into a clock face to model a clock and get children to show various times using their hour hand only clocks. Then ask what time it will be half an hour later and show how it will be 3 o’clock.
Then half past 3, and so on. Repeat this using your hour hand only example and get the young learners to do the same.
Once this is secure, there is lots of math you can do using your circular number line to work out what time it will be:
- Half an hour later
- Half an hour earlier
- An hour and a half earlier
- An hour and a half later
All four of these options should include examples that bridge 12. This video features a teacher explaining how she teaches o’clock and half past in this way. I also recommend this website which contains a useful teaching clock to help (you can turn different hands “white” so you can only see the hour, minute or second hand).
Finally, at this stage, first grade children are ready for the familiar worksheet with clock faces showing o’clock and half past. Although you will have removed the minute hands from these!
Tell the children that when they see a clock with two hands, to ignore the other hand for now and that they will still be able to tell if it is o’clock or half past or nearly o’clock or half past.
Throughout the day when you are teaching telling time draw attention to the class clock and say things like, “we go to music class at 2:30 and look, the hand is almost half way between the 2 and the 3, that must mean it is almost 2:30, so in a few minutes it will be time for music class.”
This is so much easier than having to remember about a 6 meaning half past. I showed my 1st grade teacher how to teach time using this method and she was thrilled how easy it was for them.
Telling time in lower elementary: Teaching quarter past and quarter to
The next lesson, ask the children what time they think this might be?

Point out that it is not half way past yet so it can’t be half past, but it is past the two, so it can’t be two o’clock.
Move your 2 and 3 post-it notes really far apart (away from the rest of the number line) and place the hand at half past. Then add another identical hand half way between 2 and the half past hand:

help children understand quarter past when teaching time
Then remove the half past hand:

help children understand quarter past and to when telling the time
Introduce the idea that this is quarter past (i.e. halfway between o’clock and half past). Then model this on the full 1 – 12 timeline, before moving to show it on your adapted clock face. Next, get the children to use their adapted clock faces to show quarter past various times. Then repeat the whole process for quarter to.
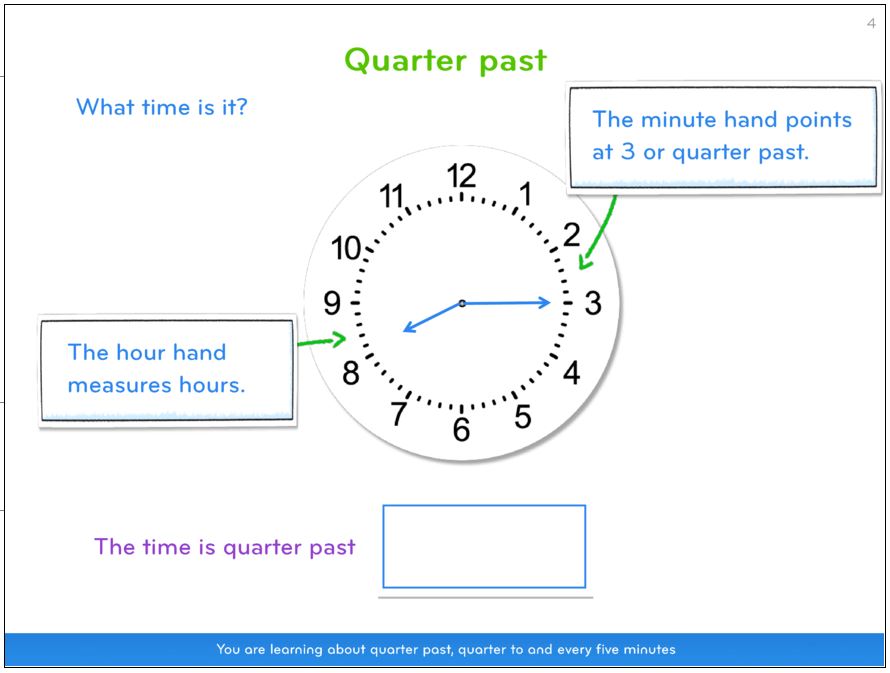
We won’t introduce using our clock to work out what quarter of an hour earlier or later is at this point, as their concept of one quarter is probably hazy and we can leave that until they have done a lot more work on fractions.
At this stage it’s worth teaching kids that it can be difficult to know exactly where to put our hour hand for quarter past and quarter to, because the hour numbers are quite close together. This will pave the way for introducing the minute hand.
Telling time in lower elementary: Teaching the minute hand
When teaching time in lower elementary we will initially introduce the minute hand by emphasizing the position (rather than the number) to which they are pointing. Introduce the minute hand as a tool to help us check that we have read the hour hand correctly using a clock face, without numbers divided into quarters.
Explain that when the minute hand points straight up, that means it’s o’clock. Turn the hand to show half a turn, so the hand is straight down. It’s turned half way around so this shows it is half past. There’s no need to introduce quarters for a while, until these first two are secure.
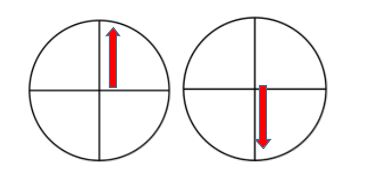
Getting the children to stand up and do half turns themselves can help here, as some children find the whole concept of turns really tricky.
Then get the children on their little clocks to make o’clock and half past using the minute hand (their clocks should only have a minute hand which should be longer than the hour hand they have previously been using).
At this point you will need two clock faces. One is going to show the hours and the other will show just the minutes.
Now, using both clocks side by side, show how the minute hand is there to help us check we have read the hour hand correctly. Demonstrate this on your two post it clocks like this:
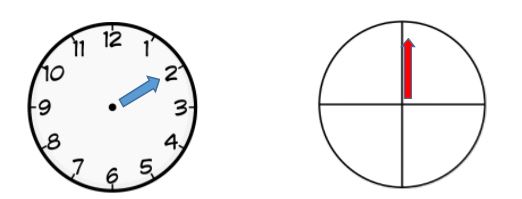
Explain that we look at our hour clock first. It looks like it’s 2 o’clock. But now we check by looking at our minute clock. Is the minute hand pointing straight up? If yes, then we’ve checked its 2 o’clock.
One important thing to note (that seems obvious to us but is not to some children) is this: when we say the hand is pointing, we mean the very tip of the arrow and not the wider parts of the arrowhead.
Making this clear by drawing lines from the tip out to the circumference of the circle can help children see what we mean.
This is also a useful strategy for later, to show when the hand might at first glance seem to be pointing “at” a numeral but is actually a little way past e.g. when teaching minute intervals.
Go through the same procedure for half past. Check the hour hand clock first. It looks like it is halfway between the 2 and the 3, so it is probably half past 2:
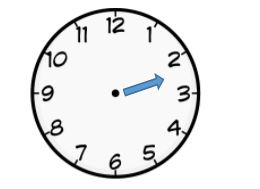
So let’s check by looking at the minute hand:
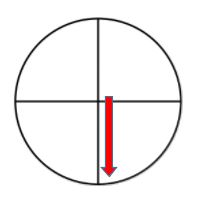
It is pointing straight down, so we were right, it was half past. Then show this clock:
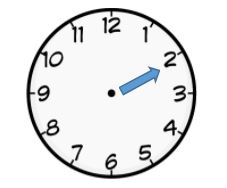
Reflect on how, in this instance, it is hard to tell exactly where the hour hand is pointing. Draw a line onwards from the arrow tip.
This will show that it is slightly past the 2, so must be later than 2 o’clock, but not quite half way between the 2 and the 3, so it is probably not half past either.
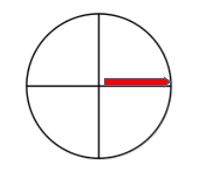
Maybe it is quarter past. At this point, ask: has our minute hand gone a quarter of the way around its clock? If so, we will know it is quarter past. Now you’re ready to introduce the quarter turn and the idea of quarter past.
Do lots of examples where children have to read the two clocks side by side, as below:
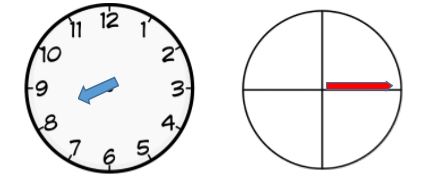
When you introduce quarter to, do this by using your minute hand clock starting straight up and moving the minute hand backward towards what would be the ‘9’ position, were you using numbers.
Explain how the hand is now a quarter of the way to the top, so is showing a quarter to:
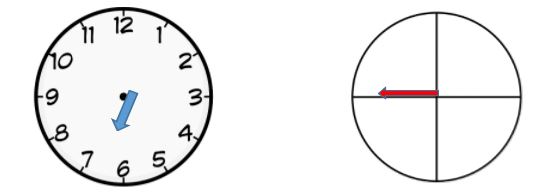
Children will need lots of practice reading examples like these, but once they have got it, you can make the point that in real life, people don’t wear two watches.
In real life, both hands are on the same watch. To read a real clock or watch, make sure you read the hour hand first and then use the minute hand to check you were right. At this point, you can finally introduce regular clocks and do lots of practice reading o’clock, half past, quarter past and quarter to.
Telling the time in upper elementary: Teaching the minutes
When teaching time in 2nd grade, in order to introduce reading the minute hand using numbers rather than just position, we will revert to using two clocks.
But before that, spend a while helping children understand how long a minute is. To do this, see how many paper clips children can pick up one at a time in just one minute, or how many jumps, or what it feels like to be completely still and silent for one minute.
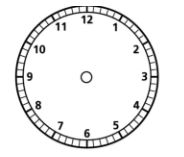
Explain there are 60 minutes in one hour, showing the sort of clock shown below, where every minute is marked. Children could try counting too, in order to check that there really are 60 spaces!
Then ask the children to make a 1 to 12 number line using cubes grouped in 5s. Explain that we are doing it on a number line first to make it easier and that each cube represents one minute. Also explain that rather than having to count the minutes in ones they are grouped in fives, to make it easier.
Telling time at upper elementary: Teaching minutes past the hour
Model counting along the clock, while counting the groups of 5 cubes (so 5, 10, 15, 20 etc). Add a second row of post-it notes above the first, with these multiples of 5 on them, but for the last one, put a 0 as well as a 60.
This is because we will initially express all times in terms of minutes past the hour, and come back later to learn how to express time in terms of minutes to the next hour.
So, now place your minute hand on the number line at various points:

Explain that when the minute hand points to 4, that means it is 20 minutes past whatever number the hour hand is showing. And so on for all the numbers from 1 to 11. Then explain that if it points to 12 that’s a whole hour. We don’t say 3:60, we say 4 o’clock.
Your next step will be to reintroduce our two clocks. In groups, children should make two clocks using post its or as in the picture below.
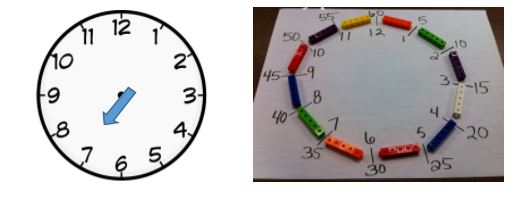
The minute clock needs to have groups of 5 cubes separating each numeral, and a second circle of digits with the multiples of 5 forming a second outer ring. Go through a series of examples where children have to read the hour clock first, and then the minute clock.
Do make sure you try and get the hour hand to be in the right place for the minutes!
At this point the children are probably ready to read both hands on the same clock at the same time. Here, do the more usual worksheet practice (but still not expressing time as minutes to the hour).
Telling time at upper elementary: Teaching minutes to the hour
In order to begin teaching children minutes to the hour, make the link between quarter past, half past and the :15 and :30 versions. Then use :45 to point out the discrepancy.
We say 45 minutes past 9, but a quarter to 10. On the cube clock, count in 5s counterclockwise from 12 back to 7, writing these numbers to form a third ring.
Then, point to number 11. Say ‘When the minute hand points to 11, this shows it is 55 minutes past the hour but 5 minutes to the next hour.’
Next point to 10. Say, ‘when the minute hand points to 10, this shows it is 50 minutes past the hour but 10 minutes to the next hour’, and so on up to 25.
As previously, do this on two clocks. Read the hour first, then give the time in minutes past, then finally in minutes to, reminding students that as it is ‘to’ the next hour. Again, allow plenty of practice before swapping to both hands on the same clock (and then lots more practice!)
If children get stuck learning to tell time
If children get stuck, backtrack and consolidate the previous step. Some children may find the minutes to the hour a step too far for now. In which case, leave it and let them become really proficient in telling the time in terms of minutes past the hour. Come back to that next term.
In the interim, practice telling the time every day in class (using minutes to the hour) so that this becomes something children can do easily and automatically.
As you teach this, you will see that having broken it down into tiny steps shows just how complex telling the time actually is. It is a topic where we expect children to coordinate lots of different things simultaneously, which quickly overwhelms the working memory.
However, if we give children plenty of time to practice each component separately, this step will become stored in the long term memory as a ‘chunk’.
In the same way we no longer consciously sound out every letter when we read but can just ‘see’ what a word says, given sufficient practice, children will be able to just ‘read’ a clock or watch.
Once they reach this stage we can begin introducing some of the more complex concepts they must learn in upper elementary, such as estimating to the nearest minute and intervals of time.
As in all teaching, whenever children struggle with something we are trying to teach them, it is worth asking: have we overwhelmed their working memory by underestimating how complex something is.
What seems simple to an ‘expert’ may well be composed of many tiny steps, each of which need teaching separately.
Read more
- Common Math Misconceptions (And How to Overcome Them)
- Why My School Banned Grading
- Learning and Memory: How to Beat Brain Drain
Learning to tell the time is one of those topics that can require a very individualized approach. Children grasp the concept at different speeds and with different levels of comprehension. It’s worth enlisting the help of parents in support of whatever method you’re choosing as a school to teach telling the time.
Where possible, personalized one-to-one tutoring, such as that provided by Third Space Learning’s AI tutoring with Skye, is an ideal solution for this topic so students can work through the concept slowly, cementing each step in the process before moving on.
Do you have students who need extra support in math?
Skye—our AI math tutor built by experienced teachers—provides students with personalized one-on-one, spoken instruction that helps them master concepts, close skill gaps, and gain confidence.
Since 2013, we’ve delivered over 2 million hours of math lessons to more than 170,000 students, guiding them toward higher math achievement.
Discover how our AI math tutoring can boost student success, or see how our math programs can support your school’s goals:
– 3rd grade tutoring
– 4th grade tutoring
– 5th grade tutoring
– 6th grade tutoring
– 7th grade tutoring
– 8th grade tutoring
The content in this article was originally written by primary headteacher Clare Sealy and has since been revised and adapted for US schools by elementary math teacher Christi Kulesza.
