
What Is A Rekenrek? Explained For Elementary School
Rekenreks are manipulatives used to build number sense and number relationships in the pre-kindergarten and early elementary classroom. In this article, learn how to best use this versatile manipulative to support your teaching for a range of topics.
Number sense and number relationships are the foundation of the math curriculum in the early years of elementary education. Students have to be able to count, add and subtract as well as understand subitizing (recognizing how many of something there is without counting) and know their number bonds in order to be able to access math later on in their educational journey.
Rekenreks are excellent math manipulatives to use in pre-kindergarten and lower elementary to support these concepts. They are also gaining popularity beyond this throughout the elementary years to support topics such as rounding.
In this article, we are going to explore the rekenrek counting tool, how it can be used in schools and some examples of rekenrek activities that you can use with your students.
What is a rekenrek?
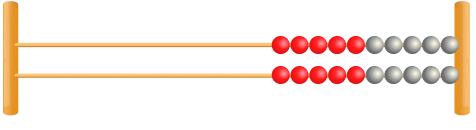
A rekenrek is a counting frame, similar to an abacus. It has ten beads on each row, five white and five red which supports the development of number sense.
It was initially developed by Adrian Treffers at the Freudenthal Institute in the Netherlands, the word rekenrek translates from Dutch as ‘calculating frame’.
Since many classrooms are familiar with both abacuses and bead strings (which also have red and white beads), children and teachers alike can quickly become familiar with their usage. While rekenreks often have just two rows of ten beads, they can sometimes look more like a traditional abacus with ten rows.
How does a rekenrek work?
In the most simple sense, a rekenrek works by sliding the beads from one side to another. To use a rekenrek, children must have mastered one-to-one counting – that is knowing that when counting objects, one word matches to one object.
Interestingly, to use a rekenrek you begin with the row of beads on the right hand side, ready to move left. Initially, students may move the beads on a rekenrek one at a time, particularly when learning to count. However, it is optimal for them to learn to slide the desired number in a single motion to support subitizing.
Advantages and disadvantages of rekenreks
Advantages
- Rekenreks are a very visual tool to help build number sense
- They encourage hands on learning
- Young students are able to confidently use them independently
- They are versatile
- They encourage the use of vocabulary and support reasoning and problem solving
- They help students to subitize up to and beyond 10 by splitting ten into two groups of five
- It is a single piece of equipment – no small parts to get lost
Disadvantages
- There is an initial cost (from approx. $10 per piece for a child’s size), which can be particularly costly considering it is recommended that you have one per child

Meet Skye, the voice-based AI tutor making math success possible for every student.
Built by teachers and math experts, Skye uses the same pedagogy, curriculum and lesson structure as our traditional tutoring.
But, with more flexibility and a low cost, schools can scale online math tutoring to support every student who needs it.
Find out moreIdeas for using rekenreks in math
Rekenreks and place value
Rekenreks can be used to support the understanding of early place value and number sense. Students need to be able to understand that they don’t necessarily need to count every bead.
As a rekenrek has the two different colors, it can be easy for students to visualize numbers and relate them to five or ten.
Here we can see that the rekenrek is showing 5 red beads and 2 white beads, therefore it is representing the number 7.
There are two ways that you could check if children are subitizing:
- As the teacher, model using a rekenrek and move a set number of counters (as shown in the example above) and ask the students what number you have made.
- The students could each use a counting frame and be asked to show a given number.
You can use either of these activities as a form of formative assessment and watch whether the students are subitizing or counting each individual bead.
Read more: What Is Place Value?
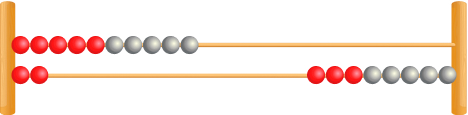
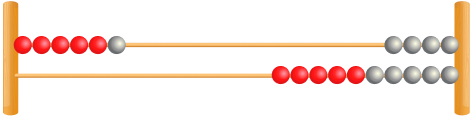
Rekenreks and number bonds
Rekenreks can be used to recognize number bonds up to 20.
As with subitizing, you could either show students a pair of numbers on the rekenrek or ask them to show you the number bonds.
For example, as shown below, you could ask students to show 8 on the left hand side of the counting frame. You could then ask how many are left on the other side – the students should be able to see that there are 12. You could then write on a whiteboard 8 + 12 = 20.
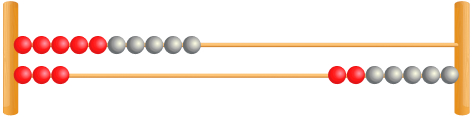
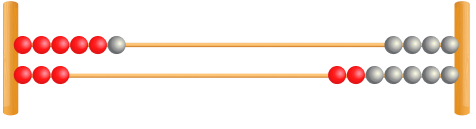
Once students understand the commutative relationship for addition and the inverse relationship between addition and subtraction, you could then show them a rekenrek (as below) and ask them to write on a mini-whiteboard all of the calculations this would show. This is an example of how a rekenrek can be used to support reasoning skills.
Here, students could give you the following calculations:
14 + 6 = 20
6 + 14 = 20
20 – 14 = 6
20 – 6 = 14
You could stretch some students even more, by challenging them to move the equals sign to the beginning of the calculation:
20 = 14 + 6
20 = 6 + 14
6 = 20 – 14
14 = 20 – 6
With a larger 10 row rekenrek, you can teach number bonds to 100 in a similar way.
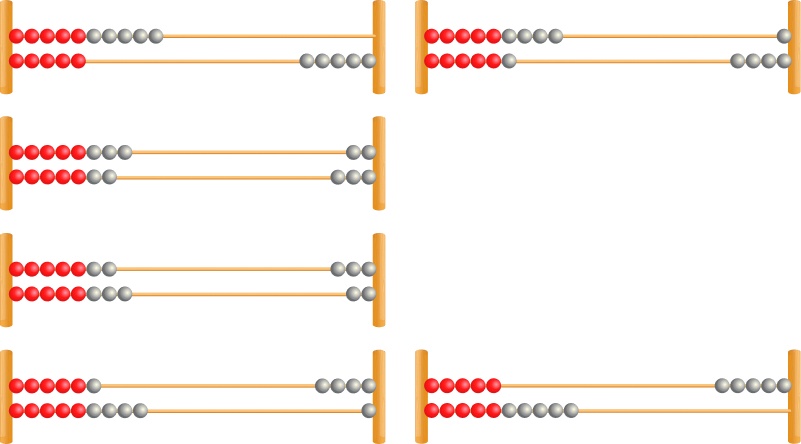
Rekenreks and addition
The rekenrek can also be used to support addition which does not relate to number bonds.
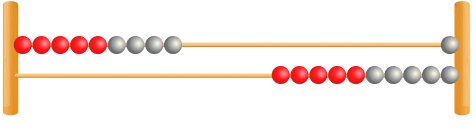
Let’s take the calculation 5 + 7.
First, ask students to move 5 beads in the top row and 7 in the bottom, as below.
There are now three methods the students could use to find the answer:
1. Count the beads
While this will be the method that students naturally gravitate to, it can easily contribute to making mistakes. It is also not very efficient as the numbers get larger.
2. Doubles
By moving one bead from the bottom row back to the right, and then moving one from the top to the left, students will be able to see a double:
If doubles are something they have already been taught, they can now see that the answer is 12.
3. Make 10
In a similar way to the doubles, move a bead from the bottom row right and one from the top row left. Keep repeating this until you have a full row at the top.
Here, the children can see that the answer is 12.
The larger rekenrek can be similarly used to add larger numbers within 100.
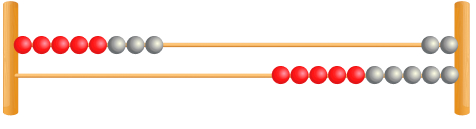
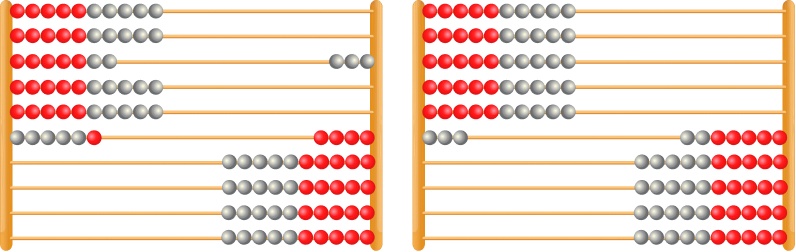
Let’s take a look at 43 + 29.
First, I have moved 43 beads to the right, followed by 29.
Now, I am going to alternate moving one bead from the row of 9 back to the right, and one bead from the row of 3 to the left.

By this point in their numeracy journey, students will be able to count in tens so will be able to see that there are 7 tens = 70 and two ones, so the answer to 43 + 29 is 72.
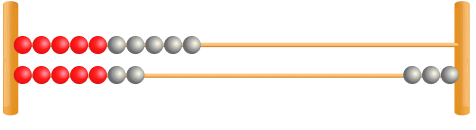
Rekenreks and subtraction
As subtraction is the inverse of addition, the process to subtract using a rekenrek is very similar to addition.
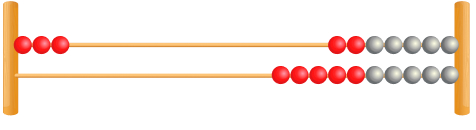
For example, if the calculation is 13 – 4, we would begin by moving 13 beads to the left.
Then, students will move 4 back to the right, taking away 3 first and then 1.
Now, using the subitizing that they have learned before, they will be able to see that the answer is 9.
For larger numbers within 100, the process begins in the same way.
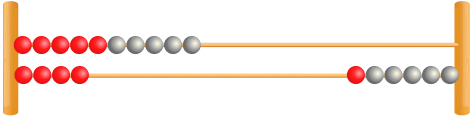
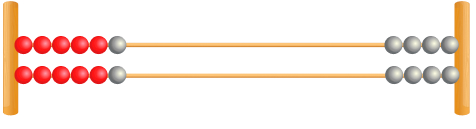
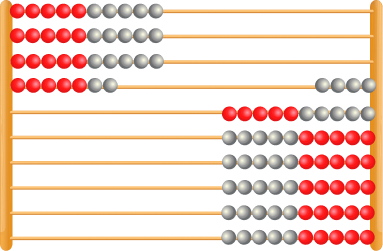
For the calculation 83 – 34, we would begin by moving 83 beads to the left hand side.
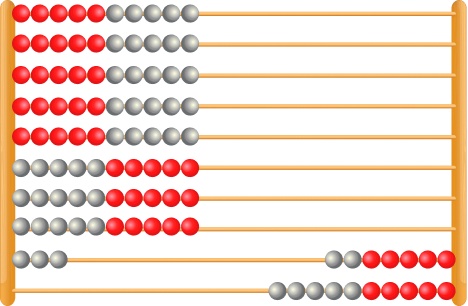
Students then need to move 34 back to the right. Encourage your students to move 3 whole rows for the thirty beads rather than counting each one individually.
This is one way that the rekenrek could look after subtracting 30 from 83.
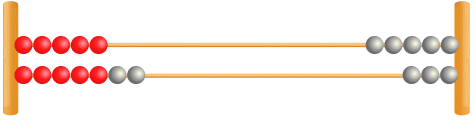
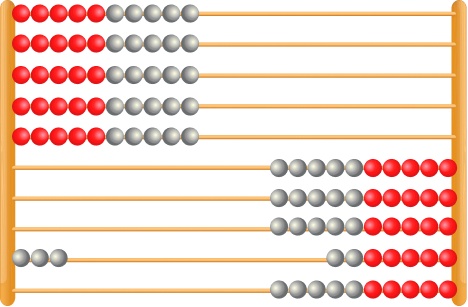
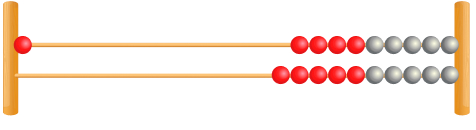
Now, students can subtract the 4 by moving the three beads on their own before taking one more from the bottom row of ten.
Now, students can see that 83 – 34 = 49.
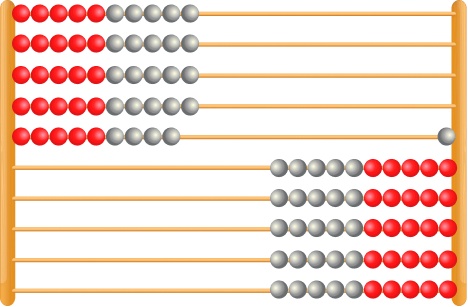
Rekenreks and rounding
Children begin to learn to round numbers in third grade. It is something that many children find difficult to master.
A rekenrek can be used as a visual learning resource to support this. The fact that there are 5 white beads and 5 red beads on each row helps to show students which way they should round a number and supports their understanding of why.
If a child is asked to round 71 to the nearest 10, they first make the number 71 on a rekenrek.
This representation clearly shows that on the eighth row, there are fewer beads on the left than the right, therefore 71 is closer to 70 than 80.
When do children use rekenreks in school?
As shown in the examples above, rekenreks can be used from pre-kindergarten all the way through the elementary curriculum. They are not only useful to calculate but can also be used to support reasoning.
Tips for getting started with rekenreks
- Spend some time with your students getting used to the rekenrek. Teach them to begin on the right and ask them what they notice.
- Show students how to move the rows of beads so that they slide more than one bead, for example 7 beads can be moved together.
- Begin with some activities that students should already be able to complete so that they become familiar with the rekenrek. For example, in pre-kindergarten, ask the children to show 2.
Rekenrek worked examples
1. I am making the number 9. How many more beads do I need to move?
Pupils need to be able to see that there are 6 here and then know their number fact 9 – 6 = 3.
2. How many different ways can you show 15 on your rekenrek?
Here, students could show 10 & 5, 9 & 6, 8 & 7, 7 & 8, 6 & 9 and 10 & 5. Hopefully, they can work in a methodical way, moving one from the top and bottom each time to ensure that they can see all of the possibilities.
3. Which number bond calculation is the rekenrek representing?
17 + 3 = 20, 3 + 17 = 20, 20 – 17 = 3, 20 – 3 = 17.
Students may also be able to move the answer to the beginning: 20 = 17 + 3, 20 = 3 + 17, 3 = 20 – 17. 17 = 20 – 3.
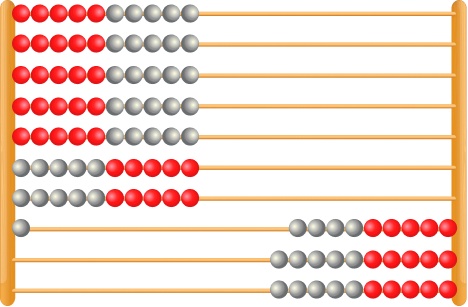
4. There are 27 children in class 2A and 26 in class 2B. How many children are there altogether in Year 2?
5. What is 36 rounded to the nearest 10? How do you know?
36 rounded to the nearest 10 is 40 because in the row of 6 beads, there are more beads on the left than the right, this means that the number 36 is closer to 40 than it is to 30.
Rekenrek practice questions
1. How many more beads do I need to make 8?
Answer: 5
2. How many ways can you make 12 using your rekenrek?
Answer: 10 + 2, 9 + 3, 8 + 4, 7 + 5, 6 + 6, 5 + 7, 4 + 8, 3 + 9, 2 + 10.
3. Which number bond calculations is the rekenrek representing?
Answer: 1 + 19 = 20, 19 + 1 = 20, 20 – 1 = 19, 20 – 19 – 1
4. In first grade, there are 24 girls and 31 boys. How many children are there altogether?
Answer: 24 + 31 = 55
5. Round 94 to the nearest 10. How do you know?
Answer: 90 because there are fewer beads on the left than on the right.
Looking for more information about manipulatives and concrete resources for the math classroom? Learn more about:
Read more: Math Dictionary For Kids
Begin with all of the beads on the right hand side. Use your finger to slide the desired number of beads to the left.
Children can use a rekenrek from when they are beginning to understand numbers right through elementary school.
A rekenrek has five red and five white beads on each row. Each bead has a one-to-one representational value. By contrast, on an abacus, the value of each bead increases as you count.
Do you have students who need extra support in math?
Skye – our AI math tutor built by experienced teachers – provides students with personalized one-on-one, spoken instruction that helps them master concepts, close skill gaps, and gain confidence.
Since 2013, we’ve delivered over 2 million hours of math lessons to more than 170,000 students, guiding them toward higher math achievement.
Discover how our AI math tutoring can boost student success, or see how our math programs can support your school’s goals:
– 3rd grade tutoring
– 4th grade tutoring
– 5th grade tutoring
– 6th grade tutoring
– 7th grade tutoring
– 8th grade tutoring
The content in this article was originally written by Lauren Marlow and has since been revised and adapted for US schools by elementary math teacher Christi Kulesza.